Color Management/custom profiles at capture - slides

@Mark_Segal : Thanks for your inputs.

My “scanner” is my DSLR and X-Rite’s Colorchecker targets have been developed for these.

I’ll order a Fuji target from coloraid.de for good order, and find out what works best in my specific setting. I’m mainly interested in Velvia. It can only help to have options (and to satisfy curiosity). They’re affordable enough. I’ll also add a reflective IT8 target.

Clear: I’ll try to calibrate properly for slides and rely on NLP for (more subjective color) negatives. For now I’ll also keep shooting a target as the first pic on negatives though. Perhaps I’ll find a way to have use for it after more understanding.

Have a good weekend,

Arno

Ah, sorry, I misunderstood your set-up. For DSLR, yes a ColorChecker Passport should do it.

For the negs, no harm shooting a target with known patch values for objectively determining process accuracy, though I think you’ll find yourself relying more on the look and feel of the conversion rather than data in this area. And that’s me, a very data-driven person, saying this! :slight_smile:

Wondering what software you are thinking of using with this target? It’s hard for me to envisage just how much of a difference using targets produced on different films will change the result, the only way would be to buy them all as you suggested. Also is the purpose to make the end results from each type of target exactly the same? Rhetorical question really unless someone can explain please? There is a pretty narrow number of choices available though coloraid,de offer more than Silverfast who only have Provia and Ektachrome, and the latter is not available for the latest ISO 12641-2 standard.

Kodachrome processing stopped in 2010 so that using a Kodachrome target hasn’t been possible for many years. Even so it must be possible to get good results from Kodachrome and I’m sure museums and picture agencies (Magnum?) etc. are doing this routinely.

The major difference of media character for transparency film is between Kodachrome and the rest of them (but there are smaller differences between the various E-6 film types). Kodachrome was specifically designed to be projected using very warm projector bulbs of the 1940s onward, so the film has an intentional blue cast, which when projected using a yellowish bulb gets neutralized so the colours look natural. When photographed using say a light table around 5000K or so, the blue cast will come through. There are two ways of correcting this: (1) a camera-based profile bespoke to this set-up, or (2) a slight curves preset used in post-processing which would shift the blue curve slightly warmer. Personally I would go for (2) because it’s flexible - one can change it to anything one finds necessary. For other films there is even less need for a camera profile, provided one finds the Adobe Standard profile for the camera being used satisfactory. As for the Kodachrome targets - almost impossible to find at a reasonable price, and yes, they are old, so their condition and suitability could be an issue.

I’m not entirely sure where this all will lead me in the end, how to use targets once I shoot them using controlled light (the same light as with what I scan) as the first picture on each future roll, but I’ll keep reporting back my findings. Wolf Faust is offering a set of targets that seem to contain most of the relevant ones for current and past film stock, so I’ll probably order that (currently awaiting on a reply after I sent some questions).

All this started out of frustration of trying to get on my (calibrated) monitor scans of slides that look the same as what I see through my optical viewfinder of my DLSR looking at the same slide. This seems an easy exercise, but it is not, and if I can’t get a slide in correct tones and colors, I’ll make the same errors with negatives, thereby providing a non-optimal starting point for conversion.

What I found out so far is that it is critical to use a proper (linear) camera profile (the Adobe provided ones do some horrid “enhancements” and are making a mess, at least for slides) as well as a proper white balance. I started out with the Adobe Neutral and Camera Neutral profiles, but these are not yet “neutral” enough. Following Nate’s suggestion, I then used the “linear” NLP2.3 profile, which improved things, but I still ended up needing a funky high WB at 11000 K, double as what my 5500 K scanning light source is providing. I then created my own linear profile for my camera using the Adobe DNG profile editor following Lightroom Linear Camera Profiles - Make Your Own - YouTube and I can now use the WB of my light source and mostly have to add saturation to get a good (but not yet perfect) representation of the slide. Shooting a Colorchecker target on the first slide and using that to create a profile for the entire chain during scanning is up next, while at the same time I can try calibrations using IT8 targets.

Hence, I’m using slides to verify if my scanning workflow has errors, and I do not yet want to embark on scanning many negatives unless I can scan slides correctly. Does this make sense? I should be able to obtain a 1:1 representation of a slide if things are calibrated and I’m not creating errors somewhere, no?

Sometimes I believe one can over-think this stuff, so let’s go back to basics. The film is not neutral to start with - especially Kodachrome, but for all of them, spots of colour you think are neutral may not be neutral because they just aren’t even though they may seem so, or the scene lighting gives them a cast (time of day, etc.) and so-called neutrality can be a moving target from one photo to the next, depending. However, if shooting in raw format it doesn’t matter. You can adjust the WB in LR or PS, and if you have enough similar photos, just make that WB a preset, sync all your digital captures to that WB, and your done with that. I’ve spent oodles of time futzing with ColorCheckers, and really, the end result is that they don’t help much in this area. Trust your appreciation of the real-world photos more.

Negatives are a different world, and I would avoid commingling what I do with slides thinking it will do wonders for conversion of negatives. Trust NLP to convert the negatives provided you make raw digital captures to be converted. For doing my negatives I set the camera WB to the temperature of the light source, but really, shooting raw even this isn’t necessary - anyhow it’s harmless. NLP’s profiles take over the process once you push the Convert button and do a very good job. The main thing to be mindful of with NLP is to set the editing parameters in the Edit tab to where you think you get the best results out of the box. I find using Lab Standard Preset, Linear Gamma Tone Profile, Auto-neutral WB and Frontier LUT generally work well - not 100% of the time as for some photos one departs from such initial settings, but on the whole a very good beginning. I should add that LR’s masking has become so good that making bespoke adjustments to specific image areas has become quick, easy and effective.

1 Like

After having started this conversation quite awhile ago, I have been away awhile for all kinds of reasons and only sparely catching up. In that time I have scanned 25,000 35mm E6 slides. I have learned a lot and that in in no small part due to y’all early on! Thank you.

Happy to answer any questions about the setup, even on the organizational and metadata end for the archiving process as this is all being given to a research institution. I feel like I have become very skilled at this!

The long and the short of it, for me, has been there is no end to the depths of seeking ever-more perfection as far as color goes. Sharpness, stability, and perfecting the light, as well. So I came up with a 2 tiered system that has worked well for mixed slides from many types of E6 film with no rhyme or reason. I also fiddled with the light source positioning, diffusion, collimation/focusing, etc. and landed in a nice place.

After around 7000 slides through the projector I abandoned center-weighted autoexposure using highlight protection, replacing that with hard shutter limits for a fully fixed exposure on all but the most thick or thin emulsion slides. It has worked wonders for consistency. On the light table I have played with various diffusion solutions


Tier 1- bulk scan with the hacked/modified Kodak Carousel + BoopBoop Trigger/advancer from Camerdactyl + Canon R5 with EF 100 2.8L + SORAA VIVID 3000ºK 7.5W LED bulb diffused and refocused through the original lens but without the IR heat lens. ISO 100, f7.1, 1/250th (protects highlights on all but the thinnest of emulsions). Lens cannot reach 1:1 due to projector design but end up around 1:1.3 and getting a 32MP file after a crop. This provided 300-1000 slides per hour depending on their cleanliness and orientation (all must be dusted, landscape, and emulsion away from camera to limit processing time) after noticing the speed early on create errors and hang ups both human and computer. There is about a 0.1% error rate if I do not rush (around 750 slides/hr).

For most people and most purposes, it is great. The 3 pros I have bulk scanned slides for have been very pleased. Prints well up to 13x19, edits easily, etc. No complaints. Generally speaking the embedded JPEG previews within the raw files still look awful. There is no amount of lowered contrast and camera profile adjustments to get them to look as they do through a loupe. The previews are magenta tinted and higher contrast than desired. That said, the RAW files work great. Control the black point on the curves, 2850ºK usually, set to Adobe Neutral (a custom could be created easily), -50 on contrast, tiny tweaks to highlights, +15 whitepoint, some minor minor tint and color channel saturation tweaks, with some basic sharpening set up on a preset and they look fantastic and accurate, reliably.

For speed, this is an incredible way to do it. I basically made a SlideSnap at home for MUCH LESS. (https://slidesnap.com/). Grand total I spent many (covid year) hours on this, but only about $450-500 compared to $3600+. It has paid for itself many times over.


Tier 2 for selected/culled images- Copy stand, homebrew handmade 97CRI LED 16x12" 4700ºK light table good for up to 8x10. R5 + Sigma ART 70mm 2.8 @ near exactly 1:1 magnification leaving a TINY bit of space to crop for errors and getting a 42MP file. If it not very flat, I can back off to 1:1.1 for a little more DOF. ISO 100, f4.5-7.1ish, 1/125-500th as needed not clipping any highlights. The edits are similar but with adjustments made accounting for the slightly differing light source. 60-150 slides/hr are possible.

This setup is much sharper than with the EF 100mm L and look great, including much better tint in the preview images though intense contrast vs the original. The RAWS are killer. It would only be sharper if I unmounted the selected slides and put them in a better holder but that is a no go for this preservation project.


I hope to switch to the Sigma 105mm ART if it ever comes to RF mount but may try the Laowa 100mm for its ability to go to 2x for half frames/110 but its high rating at 1x similar to the Sigma. I am tempted by some more exotic glass as well though mounted slides are not flat so fixed aperture glass is not really usable. I am also tempted to switch the the Panasonic SR1 for the best multi-shot implementation for larger formats but in the meantime intend to test my friend’s Fuji 100S.

In a few months, we will be more reliably focusing on more consistent emulsion types, rather than mixed up, and I will start to employ some of the color management ideas that have been thrown out along the way here since there may be a bigger budget soon. I want to try using a flash or SOLUX bulbs as well when I get more time. More construction projects!

And lastly, I want a geared copy stand, it would be so much easier than the squeeze-n-slide model I have from Smith Victor.

Thanks again everyone!

1 Like

New May 2024 update!

Switched to custom camera-specific linear profiles made from Adobe’s DNG Profile Editor. Lots of tutorials online. It was eye opening.

The truly linear profiles has made a huge difference in editing the extremely dense, contrasty slides.

I went from having to use Adobe Neutral, controlling the tint, saturation, vibrance etc and taking down the contrast, upping the whites and lowering the blacks (either via sliders or setting limits on curves), making minor adjustments to highlights occasionally, and making adjustments in Calibration to…

Doing nothing but sharpening and saturation on properly exposed slides. Also, it has shown me I can ETTR more than I have been. The highlights and shadows are so much cleaner now that they are being modified less.

100% this is a thing everyone should be doing if they are not using NLP’s linear profiles on slides already.

I thought things were good already, great even. But this is now even better and makes for a much nicer base to make prints & tifs from.

Hi @SSelvidge

Can you post a comparison that shows the difference in an image as treated with “your” profile vs. using the one offered by NLP?

Adobe DNG Profile Editor has not been updated for macOS since March 2013, it can still start in macOS Sonoma, but it has lost most of the UI. I suppose you’re on windows…or an older version of macOS.
Bildschirm 2024-05-01 um 22.30.43

I am on mac OS but have not yet updated to newest version. Woof! Why is it that super useful legacy software goes so badly to the wayside sometimes when it CLEARLY has strong utility.

I was honestly astonished at how much more neutral and easy to edit it became.

Using a Custom Linear Profile made so much difference.

What is the solution to this if and when I lose access to the DNG Profile Editor as it appears will eventually happen?

Unedited examples and light edited examples included.
SETUP: LED SORAA Vivid Bulb in a very modified Kodak Carousel projector with the IR heat glass removed, diffused with a plasticy velum paper (single sheet) and meticulously aligned colimation lens. Camerdactyl Boop Boop Trigger controlled system. Canon R5 + Canon 100 2.8L usually at ISO 100, 1/250th, f5.6-6.3.

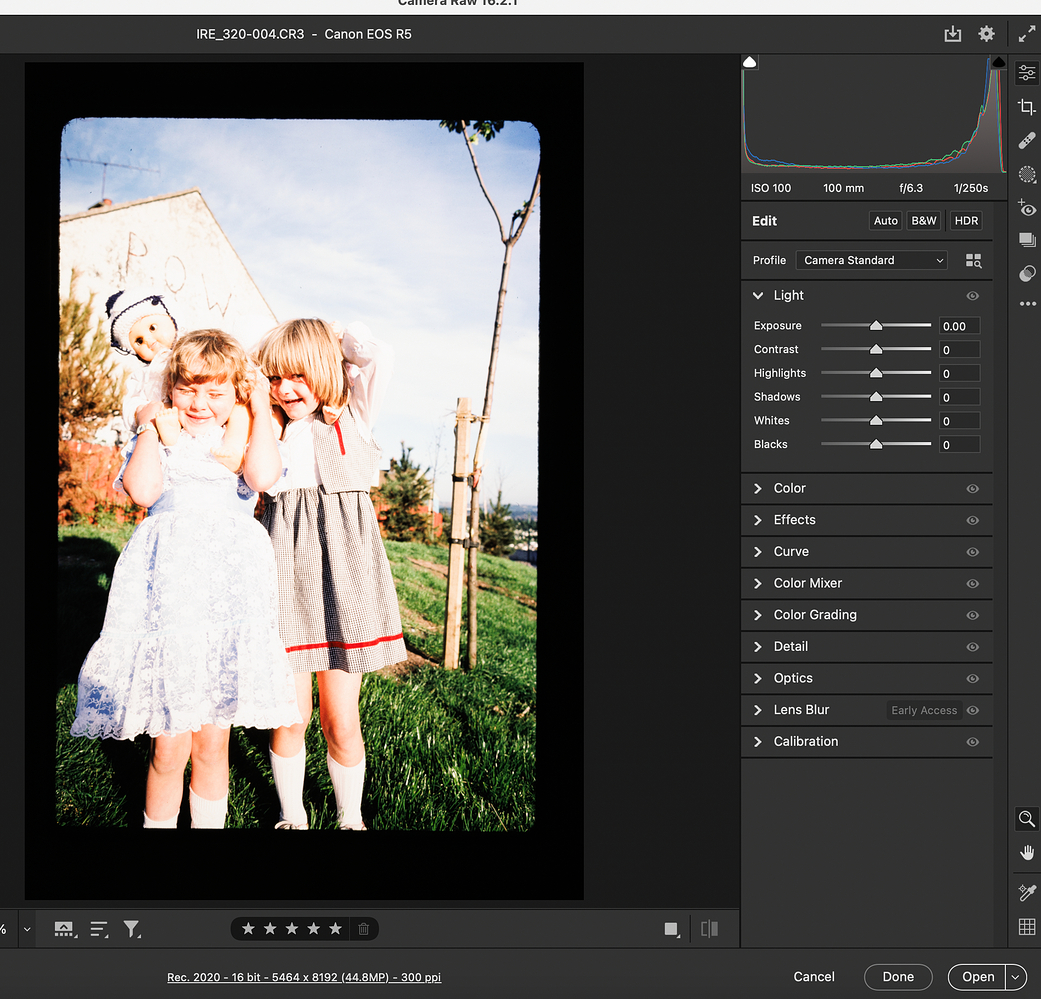
This is a basic edit of a well exposed 1980s chrome from Ireland. One thing I have found is nearly all of the images benefit from adjusting the shadow tint via the Calibration module moderately (-10 to -30 depending on the film stock) towards the green side. This helps shadows become much more neutral. I don’t know why. I think I have, finally a year+ later, found a workable long-term solution that is flexible for the high volumes I am digitizing.

The end result is a file that is punchy like a slide but not contrasty. My odl way was muddier at best and changing the contrast, black point etc, could only do so much because the gamma of the color profile was not correct for a slide’s analog-ness.

Camera Standard (no edits) - Histogram heavily weighted to highlights

Adobe Neutral (no edits) - Histogram starting to pull slighting back towards mids but still highlight heavy

Custom Linear Profile (no edits) via Adobe DNG Profile Editor - Histogram really starting to flatten out.

Adobe Neutral (with edits) - Histogram much better but compared to the bare custom profile still took more time and not as good, especialy in the highlights

THE WINNER: This one looks SO much like this image does on a loupe of through a projector. Crisp and not muddy. Strong details and smoother, nicer highlights.
Custom Linear Profile (with edits + crop) via Adobe DNG Profile Editor - Histogram really great now with tonal range, good separation, etc. And with a lot more flexibility. Perhaps I should’t drop the exposure as much and instead do the highlights?

Interesting discussion/demo, however two queries: (1) Why assume the eventual disappearance of the Adobe DNG Profile Editor? I recall much earlier discussions where people were suspecting the eventual cancellation of Adobe Lightroom Classic, but instead it has been growing from strength to strength. (2) Do you have a comparison of your custom profile with the profile NLP provides for the same task?

Mark

| SSelvidge
May 2 |

  • | - |

Using a Custom Linear Profile made so much difference.

What is the solution to this if and when I lose access to the DNG Profile Editor as it appears will eventually happen?

Unedited examples and light edited examples included. This is a basic edit of a well exposed 1980s chrome from Ireland. One thing I have found is nearly all of the images benefit from adjusting the shadow tint via the Calibration module moderately (-10 to -30 depending on the film stock) towards the green side. This helps shadows become much more neutral. I don’t know why. I think I have, finally a year+ later, found a workable long-term solution that is flexible for the high volumes I am digitizing.

The end result is a file that is punchy like a slide but not contrasty. My odl way was muddier at best and changing the contrast, black point etc, could only do so much because the gamma of the color profile was not correct for a slide’s analog-ness.

Camera Standard (no edits) - Histogram heavily weighted to highlights

Screenshot 2024-05-01 at 7.18.48 PM

Adobe Neutral (no edits) - Histogram starting to pull slighting back towards mids but still highlight heavy

Screenshot 2024-05-01 at 7.21.34 PM

Custom Linear Profile (no edits) via Adobe DNG Profile Editor - Histogram really starting to flatten out.

Screenshot 2024-05-01 at 7.19.19 PM

Adobe Neutral (with edits) - Histogram much better but compared to the bare custom profile still took more time and not as good, especialy in the highlights

Screenshot 2024-05-01 at 7.21.52 PM

THE WINNER: This one looks SO much like this image does on a loupe of through a projector. Crisp and not muddy. Strong details.
Custom Linear Profile (with edits + crop) via Adobe DNG Profile Editor - Histogram really great now with tonal range, good separation, etc. And with a lot more flexibility. Perhaps I should’t drop the exposure as much and instead do the highlights?

Screenshot 2024-05-01 at 7.20.55 PM

@Mark_Segal, I only mentioned it because @Digitizer (or someone else perhaps) had just updated to the newest MacOS and the DNG Profile editor lost functionality because some of the menus disappeared.

Mine still works but has a very scrambled appearance in some places on the UI.

The program hasn’t been updated or supported in years and though it’s simple it may stop working at some point.

Personally, I will try to make camera+lens+light specific profiles for my scanning setup (and now I will play with linear profiles for my everyday photography).

So, is there an alternative if the Profile Editor meets its demise? As long as I can do that elsewhere I’m quite happy.

And I don’t have a comparison. Never tried it as this custom way is camera+light source specific for my needs. But that might be nice to do!

Understood on the DNG editor. Would be nice if it were updated for the latest OS environments.

I asked about the profiles because I thought it could be of interest to other users to know how much value-added there is in creating custom profiles versus just using the ones supplied with NLP. We’re finding with manufacturer printer profiles these days, for example, that they have become increasingly competitive with custom profiles, such that in many instances the case for custom profiling has become less compelling.

1 Like

Yes, Lumariver Profile Designer is excellent.

Or, you can use DCP Tool to convert DCPs to XML, edit the XML, and then compile the XML back into a DCP.

I’d be interested to see this as well. There are some improvements made in the NLP profiles that should make it a better initial starting point for working with slides than Adobe Standard or a linearized version of Adobe Standard.

1 Like

I will do that soon! And I’m glad to hear there are other options.

Generally… Anything to make my workflow consistent, and fast as possible, is what I focus on… as long as the quality of the captured data is there of course! If NLP is the answer even on slides, I’m in!

I’ll be switching to a lot of negatives soon and will be needing NLP more and more. I’ll happily make an update and comparison of the profiles for y’all. Perhaps a DNG Profile editor won’t be needed?

Slides, specifically, just need the flattest profile possible. I really thought I had figured it out and there is always more to learn. The highlight details (as long as it’s not blown) are fantastic. E6 is truly an incredible looking medium. But Adobe Neutral takes lots of work to get there and ends up with a sometimes muddy file.

I’m so glad I can resync new profiles on all the older work!

Nate: I should mention, other than Lumariver there is also basICColor Input 6 (basICColor input - Digitalkamera und Scanner Profilerstellung, DCP und ICC-Profile | basICColor | Ingenieurbüro Dipl.-Ing. Karl Koch), which is considerably more expensive than Lumariver, but also a very high-end, technically sophisticated product that produces top-notch professional profiles for input devices.

anyone know whether v2.3 camera profile is correct when using V3 of the plugin? I think I read somewhere that the profiles don’t necessarily follow the plugin update numbering convention?

The numbers in profile names are independent from the version number of NLP, they mostly reflect the inner workings of a profile and the point in time when the profile technology was introduced. Think of it as a generation number.

The numbers in profile names cause irritations over and over again which is unfortunate. Maybe @nate can do something about it.