Weird colors coming from my scan

I just got NLP for my home scanning setup since my local lab cannot scan 120.

I followed the steps and watched multiple videos online but for some reason am getting pretty wild looking colors from my scans.

Camera- Canon r6 // Lens- 50mm macro // Light- amazon multiple colors and light sensitivities // NLP V3.1.1 (trial mode)

My steps: Camera settings- f/8, aperture priority, ISO 100, RAW- upload to LR, get WB from border, do border buffer, then convert. I’ve also tested all three light settings on my light and the result stays pretty much the same. I attached my final image but was unable to attach the RAW. I have watched multiple videos and everyone that I have seen, does it pretty much the same way. I am assuming I’m doing something wrong but I am not able to find any answers.

TIA

Welcome to the forum @devingwinn8

The converted image looks wild indeed, some of it looks blown. Otherwise, it’s hard to say what the source of the trouble could be.

  • Does the histogram cling to either side of the histogram window?
  • Histogram width: narrow or wide?
  • Film details? Year of manufacture or exposure?
  • Have you tried converting several times?

If you can share the unedited scan through a share or service like wetransfer.com, we could try to analyse the situation and possibly propose a way to a less OTT image. Sharing the scan also helps to preserve your valuable trial allowance.

I’m not around my computer right now, when I get back to it, I will try and send the file.

The histogram definitely clings to the left. Film was not expired. Portra 400. Yes, I have converted several times with different lighting as well.

https://transfer.zip/quick#yYP6bD4ujGnYk6kuxWZSlo4hnigfkEPGH8J8srGqu9A,350e0e2b,R

Here is the TIFF, unedited. I believe the link should work.

Update:

I scanned the rest of that roll which had some indoor shots with flash and they turned out perfectly fine. Upon talking with a friend, he said that if there isn’t enough black point in a photo, NLP kind of gets funny. I tried putting the black clipping down, but it really just takes away from the whole shot. I tried copying some settings from another scene in the roll, but that did not help either. And I also tried leaving a little bit of the border in while converting. If there is a workaround for this, I’m all ears. Since the majority of my work is landscapes, I really hope this won’t be a persistent issue.

Thanks for the link, but it’s expired. Seems to be good for one download only.

Can you resend a link that lasts longer?

When a scan is over- or underexposed, conversions can turn out weird. This has to do with how NLP works: It looks at available tonal values and makes the extremes fall within the range (0-255) of the histogram for the converted image. This can lead to overly saturated or off-colour results.

Rescan the image making sure that the histogram of the converted image is (evenly) spread within the 0-255 range. Leave some room at both ends, e.g. if you use “structure” or any other slider that increases micro-contrast.

I’ll rescan today and try to get the photo to fall within the range. I’ll report back, thanks!

Ran a few trials and found that this negative needs some special attention.

The conversions vary in what I limited the crop to and some took a few local and global edits in Lightroom…without using a positive copy. Things should get easier to correct with a positive.

Crop: limited to a horizontal strip with 2/1/2 width of sky/trees/field. First conversion cropped off the house in the trees too, the last crop was 1/1/1 horizontal strips of sky/trees/field.

Overall, the blue is too saturated, the field is too bright and there is a lot of stuff that would need to be cleaned off of the film’s surface. The WB’ed histogram is fairly narrow, widening it efore converting produces the image in the upper RH corner. In such a case, I’d work on a positive copy rather than juggling the umpty combinations of NLP parameters. But I’m sure that @nate could work it all out or @Mark_Segal

Thanks for the vote of confidence Digitizer, but I’m less sure because of the “unknowns”, at least to me. Needless to say, I’ve had many such situations where the initial result needs changes, so as you’ve done, first step is to identify the most important problems, second step being to work out the optimal strategy for addressing them.

I understand your thinking behind the various cropping options, but I normally only crop for the composition and subject matter I want, and use other means for other issues.

You mentioned making a positive copy (I assume by that you mean a TIF or some such) and working on that. Yes of course, and it makes subsequent adjustments quite easy because, as you say, LR and PS would operate in their usual ways on such a file. But at the cost of a file at least 3x the size of the original raw file. Many people don’t care about that, but I do, so I tend to exhaust the possibilities offered by the raw file before going the TIF route, and more often than not it works.

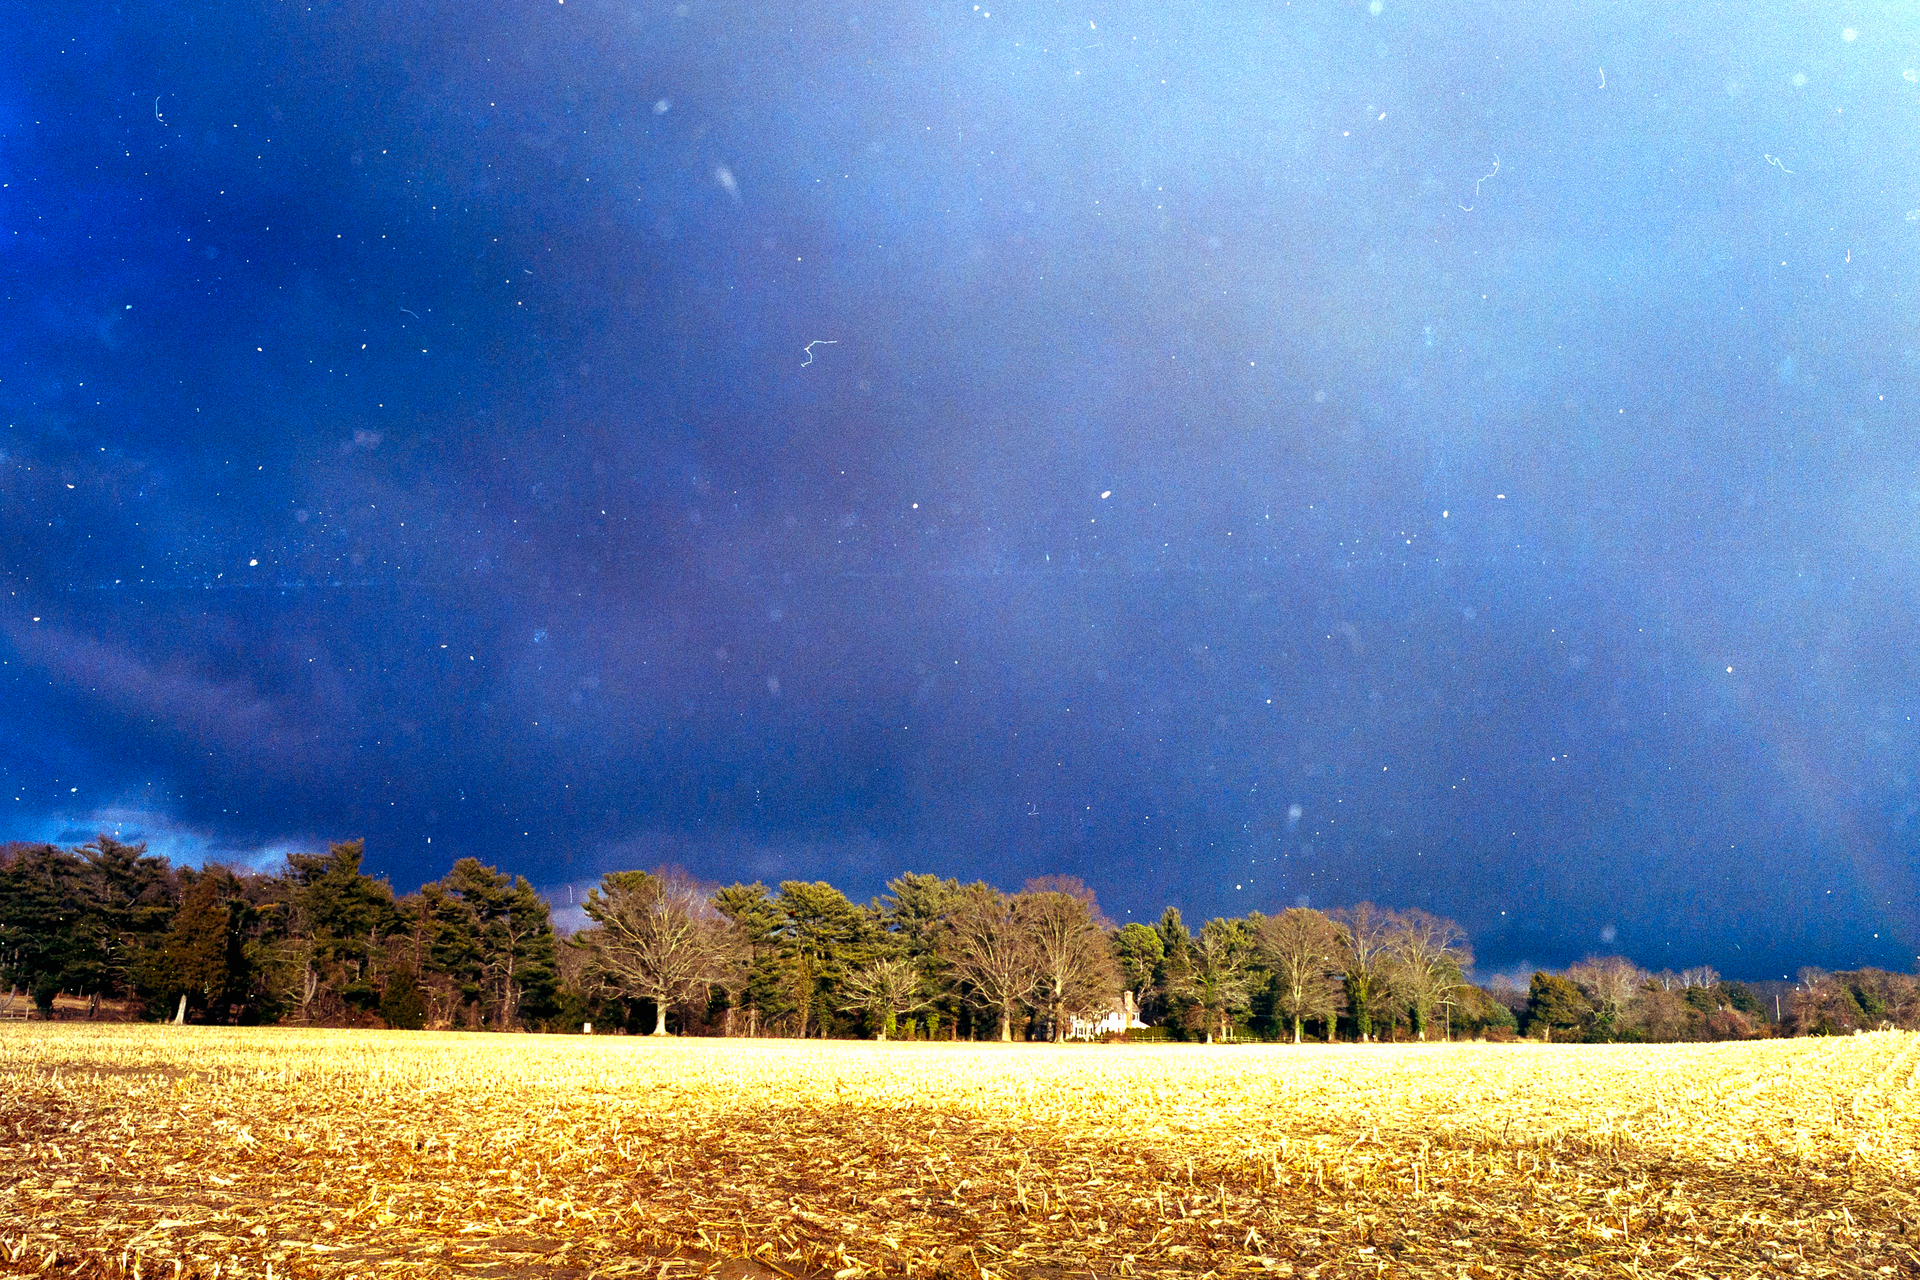
So, you identified two key problems with this image: (i) the sky is too saturated (and I’d suggest probably wrong hue, but I don’t know), and (ii) the field is too bright. Because these are such very different issues, they require different solutions, so it seems to me a textbook case for preferring local over global editing right from the outset. This is contrary to the usual advice of making all the global edits first, and then cleaning up residual local problems with targeted adjustments to local areas. In general, ever since LR’s masking capabilities became so dramatically better than they were just a few short years ago, the technology now presents us with this idea of making an initial decision whether to begin the editing process with local adjustments, or begin with global. So “local versus global” has been the initial dialog I have with myself when approaching many of my photos. And this decision has a clear implication for the choice of software to emphasize - on an image by image basis, because NLP is limited relative to LR when it comes to local editing. It lacks the masking etc and does not work within LR’s masks. That’s the “generality” of my strategy as I approach editing. (Message to Nate, BTW - if there were some way you could negotiate with Adobe to get NLP working within LR masks, that would be “nirvana”!)

Turning to the specifics of your photo here, I would opt for local from the outset, and in LR make a sky mask, then do a “duplicate and invert” which would preserve the sky mask and make another one for the remainder of the photo, which is the field. Now, once you are working within LR masks, of course because all these adjustments work back to the original negative image, the adjustments operate in reverse. [That is the one nuisance we just need to become comfortable with, because AFAIK Nate can’t do anything about that, technically, given the limitations of Adobe’s SDK.] But it isn’t hard to master. White is Black, Black is White, Yellow is Blue, Blue is Yellow, Magenta is Green and Green is Magenta - that’s it.

Sky mask: I would reduce saturation just a bit as the first step. Unfortunately, it also alters colour, so do this before adjusting hues. Then use the Temp and Tint sliders within the mask panel (in reverse) to produce the hue of sky blue your mind’s eye tells you is correct. Then go to the other mask and adjust the brightness and contrast of the field using LR’s tone tools within the mask panel. You may find this is all you need. However, having made those adjustments, if you then see merit to a global adjustment, I would revert to NLP and make those there, not using any of its presets, but just the individual brightness, contrast and colour balance sliders provided therein.

Thinking of NLP presets, perhaps I should have mentioned at the outset, for this negative I may have started the whole menu of stuff I’ve suggested above, with a judicious selection of the Tone Profile at the top of the Edit panel. For a highly contrasted, fairly dense image like this, selecting the Linear profile may get it all off to an easier start. Of all those various presets available in NLP, I find several of those Tone profiles to be the most useful.

1 Like

Hi and thanks so much for the write up.

I just got around to your email and went through the steps you sent over. I did get a different result, but it is still totally different than what my eye saw. I’m really starting to wonder if it was just a bad exposure from my camera? I do have another shot from the same day that turned out perfect, but with a little bit different of a scene. I guess maybe there are just some scenes that nlp just won’t work on. Although I did try and do a manual conversion and got the same result as nlp. Which is why I’m kind of leaning towards the exposure was off from the get.

Devin, between NLP, LR and PS there is hardly anything that can’t be worked on till you get the result that looks right to you. i.e. it has to be really bad before it’s hopeless, and what Digitizer showed in his post did not look to me at all “beyond the pale”. Should be fixable. Some of the software controls are finicky, so you need to adjust slowly and gradually, perhaps with numerous re-tries till it comes out just right. It is true that with NLP some photos come through conversion with very little left to adjust, while others do need more work, but for the latter there is usually a solution.

Thanks a lot. I’ll definitely work on it some more. I appreciate your insight.

Thanks - keep us informed. :slight_smile:

Yes, learning NLP is best done by systematically changing parameters one by one and seeing what happens.

The scene is interesting with what seems to have been a low standing sun, rainstorm clouds and a rainbow. Got a capture with similar lighting conditions, but in digital, and it has the high contrast, but strangely, your negative seems to have only slight variations of density. Strange, but worth exploring imo.

The following procedure has helped me exploring:

  • take a (difficult) shot and create a bunch of virtual copies
  • use one colour model and all the presaturation levels per row
  • repeat for other colour models
  • Pick the one closest to target and repeat converting with different border buffer or crop sizes
  • Convert using different WB settings (I have negatives that turn out best without setting WB)

See here: Improving scanning for low contrast negatives - #7 by Digitizer

Yeah, NLP opens up a whole new world of editing. I’m so used to LR controls. I also have seen people not WB their photo before converting too.

You need to make sure you’re cropping everything but the image area, or use the border buffer feature in NLP and adjust the % to convert just the image area. Check preview to be sure. I found that when I neglected this step my color consistencies were all over the place.

yes, @wleephoto , conversions can change considerably, depending on how the source is cropped. Cutting off large areas of the same colour or with clipped colours can fix many situations that suffer under said conditions. Apart from those situations, a crop can still influence the converted image’s looks, depending on how colours are distributed in the image.

The OP’s image has only small clipped parts, and I’ve cropped them off in one of the trials illustrated above. The area (The house in the woods) is fairly small though and the change is less dramatic here. Also, cropping the OP’s image to a narrow horizontal strip doesn’t change the outcome that much.

As @Mark_Segal has written above, there are ways to correct images, be it with the tools present in NLP and Lr. In this case here, the easiest way seems to act with local corrections and on a positive copy, preferably in form of a 16 bit TIFF.

Hi Digitizer - agreed that cropping can and does change the colour rendition of a conversion done with NLP, because the colour interpretation is adaptive depending on image-specific interpretation which the application performs under the hood.

On the subject of local correction approach, I do these routinely and I should say as a general preference I try to avoid making positive copies if I can manage not needing them - nothing wrong with them, it’s just a matter of economizing on storage. More often than not, I find these localized corrections using masks in LR works very well on the raw file provided one is adept at thinking in reverse when it comes to using the editing controls; agreed some people will be more comfortable with this than others. If that presents a problem to the user, or if the range offered in LR’s editing functions were inadequate, then yes, conversion to a positive TIFF photo is the way to go.