Quick question: I’m using an Olympus E-M1 to digitize some medium format film. I know that it’s best to expose to the right–but how far to the right? Should I up exposure until just before highlight clipping (which will of course be shadows when converted)? Or, perhaps just a bit to the right of a ‘normal’ exposure? Will it make any difference for conversion? Thanks.
I found that an extreme ETTR can introduce slight hue shifts in very bright areas. In exif data of one of the newer Canon cameras, I’ve seen a value of 10’000 as “linearity limit”, which translates into something like 1/2 stop below maximum.
Your mileage may vary. It might therefore be a good idea to test limits with series of exposures spaced 1/2 - 1/3 stop apart.
I would say just a bit to the right of a normal exposure… if your meter say it is a perfect exposure, maybe add 1 full stop to it.
If you go too far to the right, you could clip some sensor information (the preview in your camera isn’t always the best judge of this). Also, Lightroom’s raw engine starts to roll off highlights passed a certain point on the original, and we don’t want that.
Another method I’ve used before (that I’ve really liked) is setting my exposure so that it just clipping when directly viewing the light table (with no film in between). I know at this setting that the film itself will never be clipping, and it gives me a level playing field for the whole roll.
Hope that helps!
-Nate
1 Like
I use an Olympus Pen-F for digitizing (similar sensor to yours) and I admit that basically I just center the histogram, tweaking it only if there’s an important spike close to the edge.
I would think what you photograph matters, too: I’m mostly a people shooter, and skin tone separation is super-important to me, so I try to give more space to the left side of the histogram (which represents the highlights of the negative) to make sure they don’t clip. If you’re a landscape shooter who deals with a lot of dark foliage, you might want to reverse that thinking.
That said, I have yet to see color negatives that fill up the whole histogram: the image is formed of dyes, which never really get very opaque. If you’re doing this with conventional black-and-white film (which forms the image out of metallic compounds that can block nearly all light) and you find you’re often running out of histogram space, maybe you want to back off on your developing time a bit to hold down your highlight densities?
I’m generally in agreement with Nate. Try a stop beyond the right side, and bracket in 1/3 stop increments to check for the point of highlight saturation (burnout). His “just clipping” metering of the light table trick works well.
I always set manual white balance (for the light source) and manual exposure.
1 Like
I just remembered the mantra I learned 50 years ago. Exposure controls relative film density. Development controls contrast. A good soft-working black-and-white developer can help when photographing contrasty subjects. A contrast compensating developer (Acufine, Diafine) helps avoid highlight burnout (excess negative density) when pushing film.
Yep, I learned the same thing… although with the caveat that development controls contrast BY increasing the maximum density with respect to the minimum density. Did you ever hear the companion gag that for a properly developed negative, you should be able to read a newspaper (in bright light) through the most dense section? (At this point, some readers are probably saying, “OK, boomer, what’s a newspaper?”)
Great. Thanks for the help all. I’ll give those tips a go.
Yes, I had heard that. In practice, I always found that too thin for my taste. I exposed for shadow detail and processed for highlights.
Exposing for the shadows is certainly good advice for exposing negative film - but digital is different. If you have your digital camera set to save as RAW files, I believe a better practice is to get the brightest exposure possible, without clipping any significant highlights. This is known as “exposing to the right” (ETTR) because the histogram information appears more on the right side than in the middle.
The histogram displayed on the screen of your digital camera is for a JPEG interpretation of the RAW data, and does not accurately depict the RAW data. Most camera manufacturers build a safety factor into the camera histogram, so even when the histogram shows a bit of clipping, the RAW data may still include all relevant highlight data.
When photograping film with my Fuji digital camera (shooting RAW), I adjust the camera exposure until the histogram is just clipped on the right side, then I stop down 1/3 stop. Different settings may be required depending on how truthful your camera histogram is.
…and you can get a histogram that reflects raw data more closely if you use UniWB as described (amongst other sources) here GUILLERMO LUIJK >> TUTORIALS >> UNIWB. MAKE CAMERA DISPLAY RELIABLE
1 Like
Yes, thank you. I am somewhat familiar with the concept and work-arounds that go with ETTR. And I believe the person asking the opening question knows something about it, too. Your link to more in-depth information will be very useful for anyone wanting a more complete understanding of ETTR and how to put it into practice.
But some of the other replies mention exposing negative film for maximum shadow detail, and some readers may find that confusing. Just to clarify for anyone who may be wondering, exposing negative film for shadow detail, and ETTR for digital are two different and unrelated methods.
1 Like
Indeed. Let’s make it clear that we are talking about taking a picture with a digital camera. In this case, ETTR is the way to go unless you use a camera with a wide dynamic range and ISO invariance. Then ETTR does not help that much.
One easy way would be to try with a series of bracketed shots and check what the difference will be.
The signal to noise ratio (SNR) of an image determines the visibility of its noise. An image’s noise is dominated by the shot noise inherent in the light itself. Shot noise increases at a rate proportional to the square root of the increase in light–for example if you double the amount of light, shot noise only increases by a factor of 1.4. Thus an image’s signal to noise ratio, and therefore visible noise, improves any time the amount of light hitting the sensor is increased.
ISO invariance and good DR are also sensor characteristics that can affect image quality and optimal shooting technique, but they do not negate the SNR improvement that ETTR provides through increasing the signal faster than the noise.
So, if shooting conditions and scene DR allow for it, increasing sensor exposure to right before the clipping of important highlights will always result in a better SNR and less visible noise, even if it’s only noticeable in the shadows.
Of course, how well NLP’s algorithms work with an image exposed using ETTR techniques is a different matter.
As an aside, the common belief that ETTR is about maximizing the number of tones available at particular bit-depths is incorrect. This paper does a wonderful job of explaining it:
Did a few tests with a Canon EOS 5D Mark III and some Kodak CM400 6079 negatives from 1987 bracketing 7 shots from 0 to +2 EV. White balanced and cropped the shots as advised and submitted it to NLP treatment. Here are two shots (0 and +2EV) in 2:1 view:

At first sight, we can see that
- skin tones are reddish in the “0” shot while they are more natural in the +2 shot
- noise is almost indistinguishable
- the +2 shot features a wider tonal range - as seen in the histogram
- NLP delivers almost identical output
I find NLP to be fairly tolerant to variations in exposure, white balance and cropping:
- Did trials without cropping (setting tolerance to 25%) and without WB and got almost the same results.
- Also did an HDR from the shots and found that NLP works with these files too and delivers fine conversions as expected.
- BUT I get compressed shadows with a 1978 film (Kodacolor II 6014, 0 and +1 exp. compared)
Summary: Results vary between different films (brand and model). Sticking to the proposed procedures does not necessarily provide the best results, neither does NOT sticking to them. For best results, I propose you run your own test series.
…as mentioned, changing exposure while digitizing can influence what you get after conversion:

Three shots off a “Kodak Safety Film 6014” from early 1979
Hi Nate,
I am trying out your suggestion of shooting just the light table and clipping the exposure. I also saw you mention it here.
Could you please explain what exactly you mean by this? What should the histogram look like? I did some test shots I did with my D750, Sigma 105 Macro, and Raleno 116 light (quite bright at max brightness!).
Here are what the histograms look like:
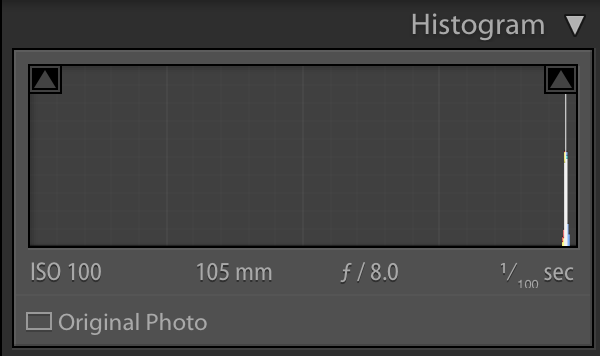


According to lightroom, highlight clipping is just starting to occur at 1/50? Would it be safe to assume to proceed with 1/50 and these settings from now on?
I actually just shot (scanned) a whole roll at 1/40 (with the same above settings). Haven’t converted yet but will let you know how they turn out.
thank you in advance!
Ramin
As with every assumption, there is room for error…
Best bet: Give it a try and/or bracket a few shots and see what the differences will be.