Inconsistent with Negative Conversion and Roll Analysis On

Hello,

Sorry to bother again after several months of silence. I don’t contribute much to the forum, but I read through the different threads as I go along with my scans with NLP.

I also want to apologize if this feels redundant, as I know there have already been posts about "inconsistency on the same roll.” I’ve read through some threads, but the replies often remain quite vague. In my case the inconsistency feels extreme, and I haven’t found a way to resolve it.

Also, my understanding of English, especially when it comes to technical terms, is not the best, so I often feel like I don’t really understand the answers, but I try my best.

For the last two weeks I’ve been facing a issue. I recently photographed a building about to be rehabilitated.

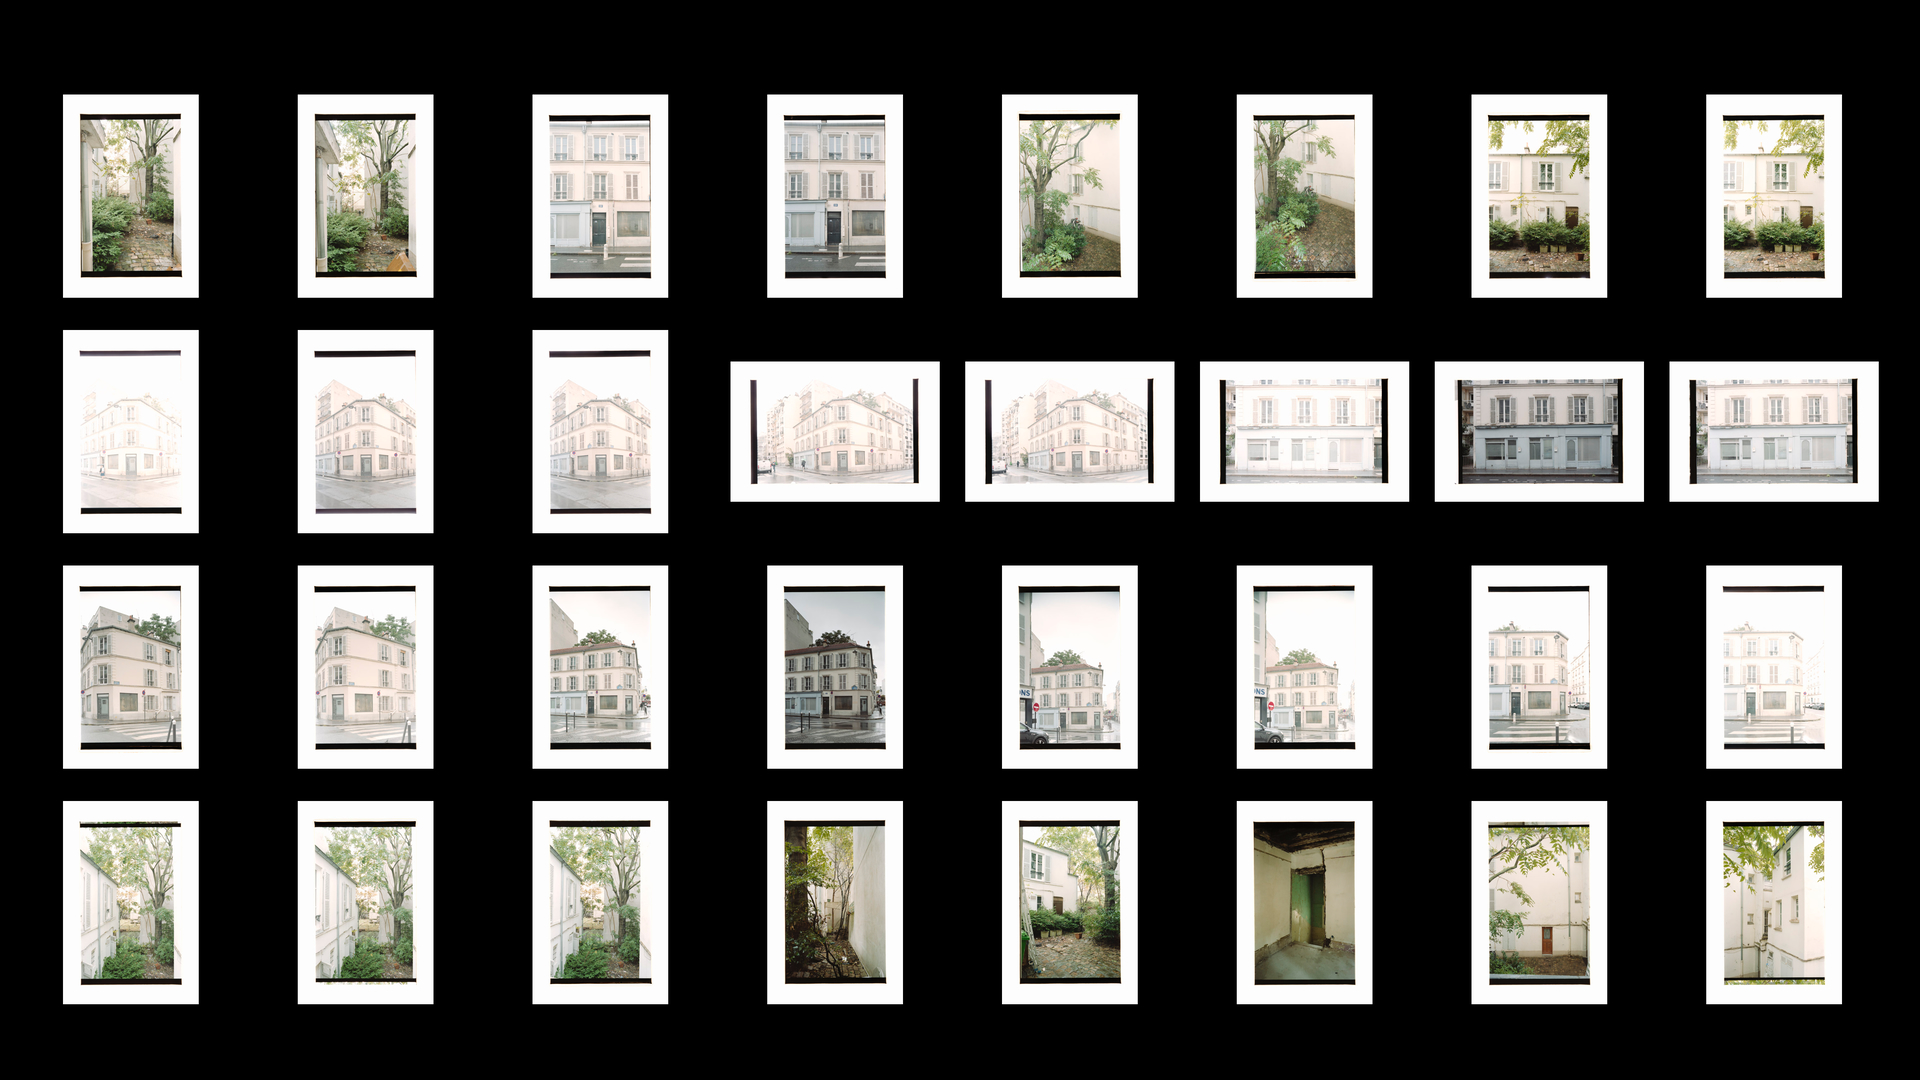
For the indoor shots, everything went fine — conversion was quick, efficient, and most importantly consistent (maybe 1–2 problematic frames out of 36, which is totally acceptable).

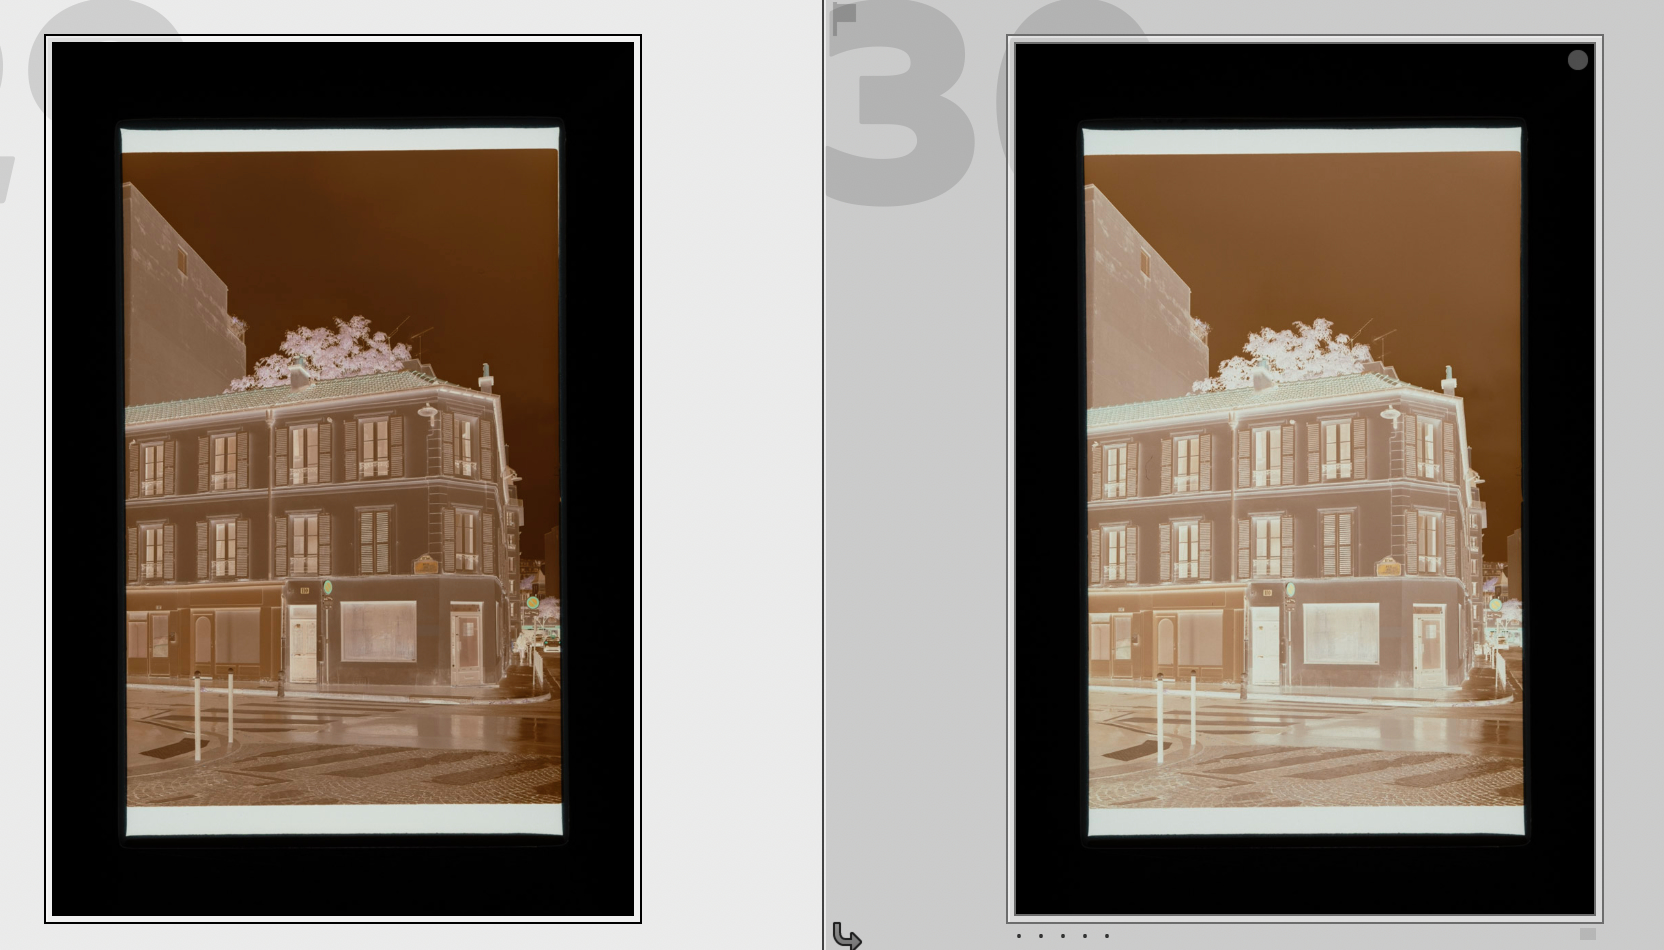
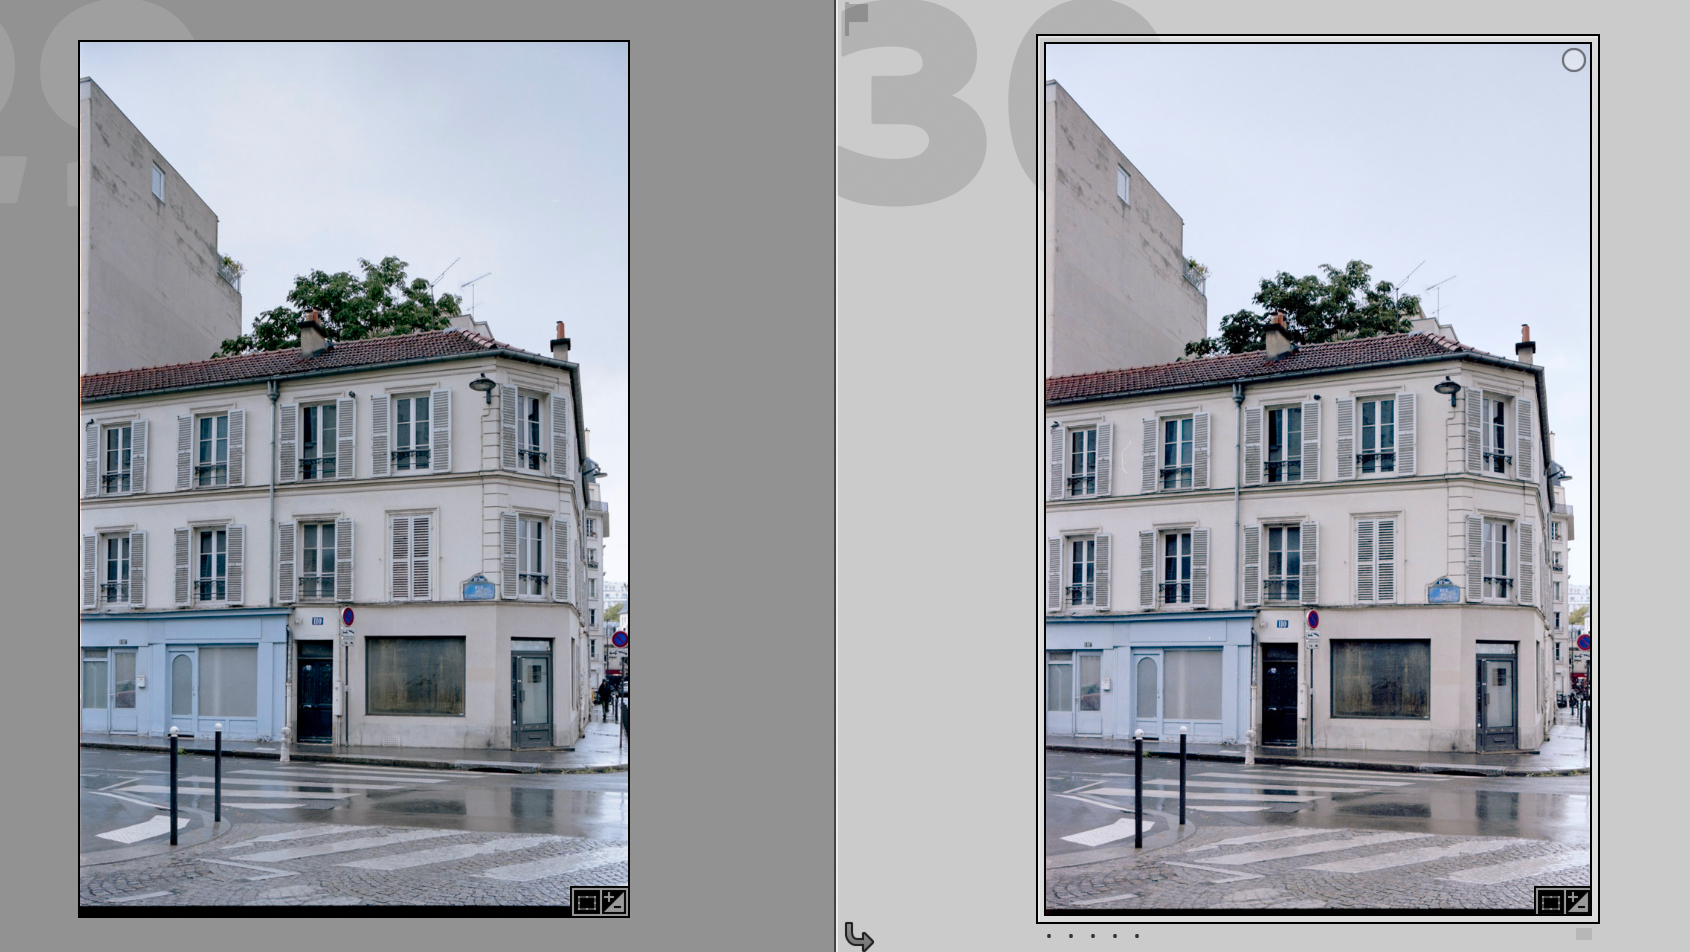
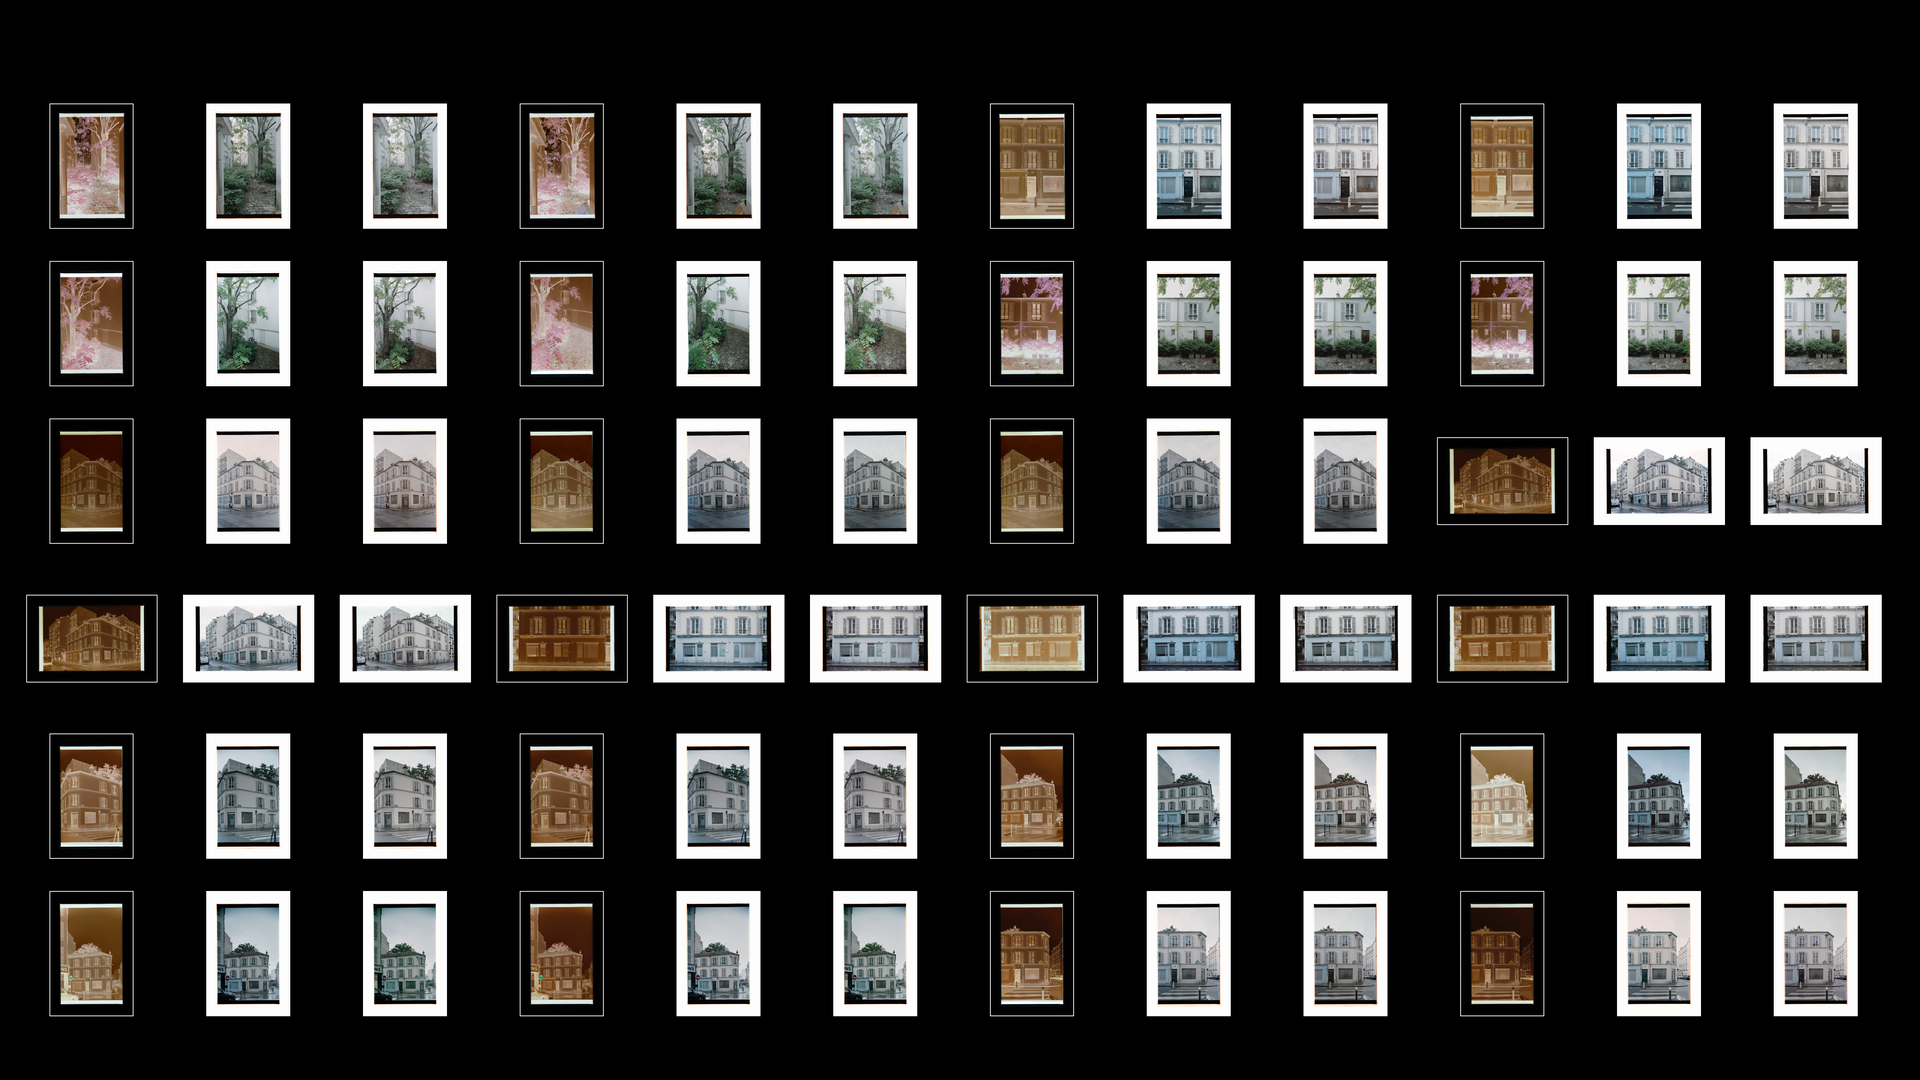
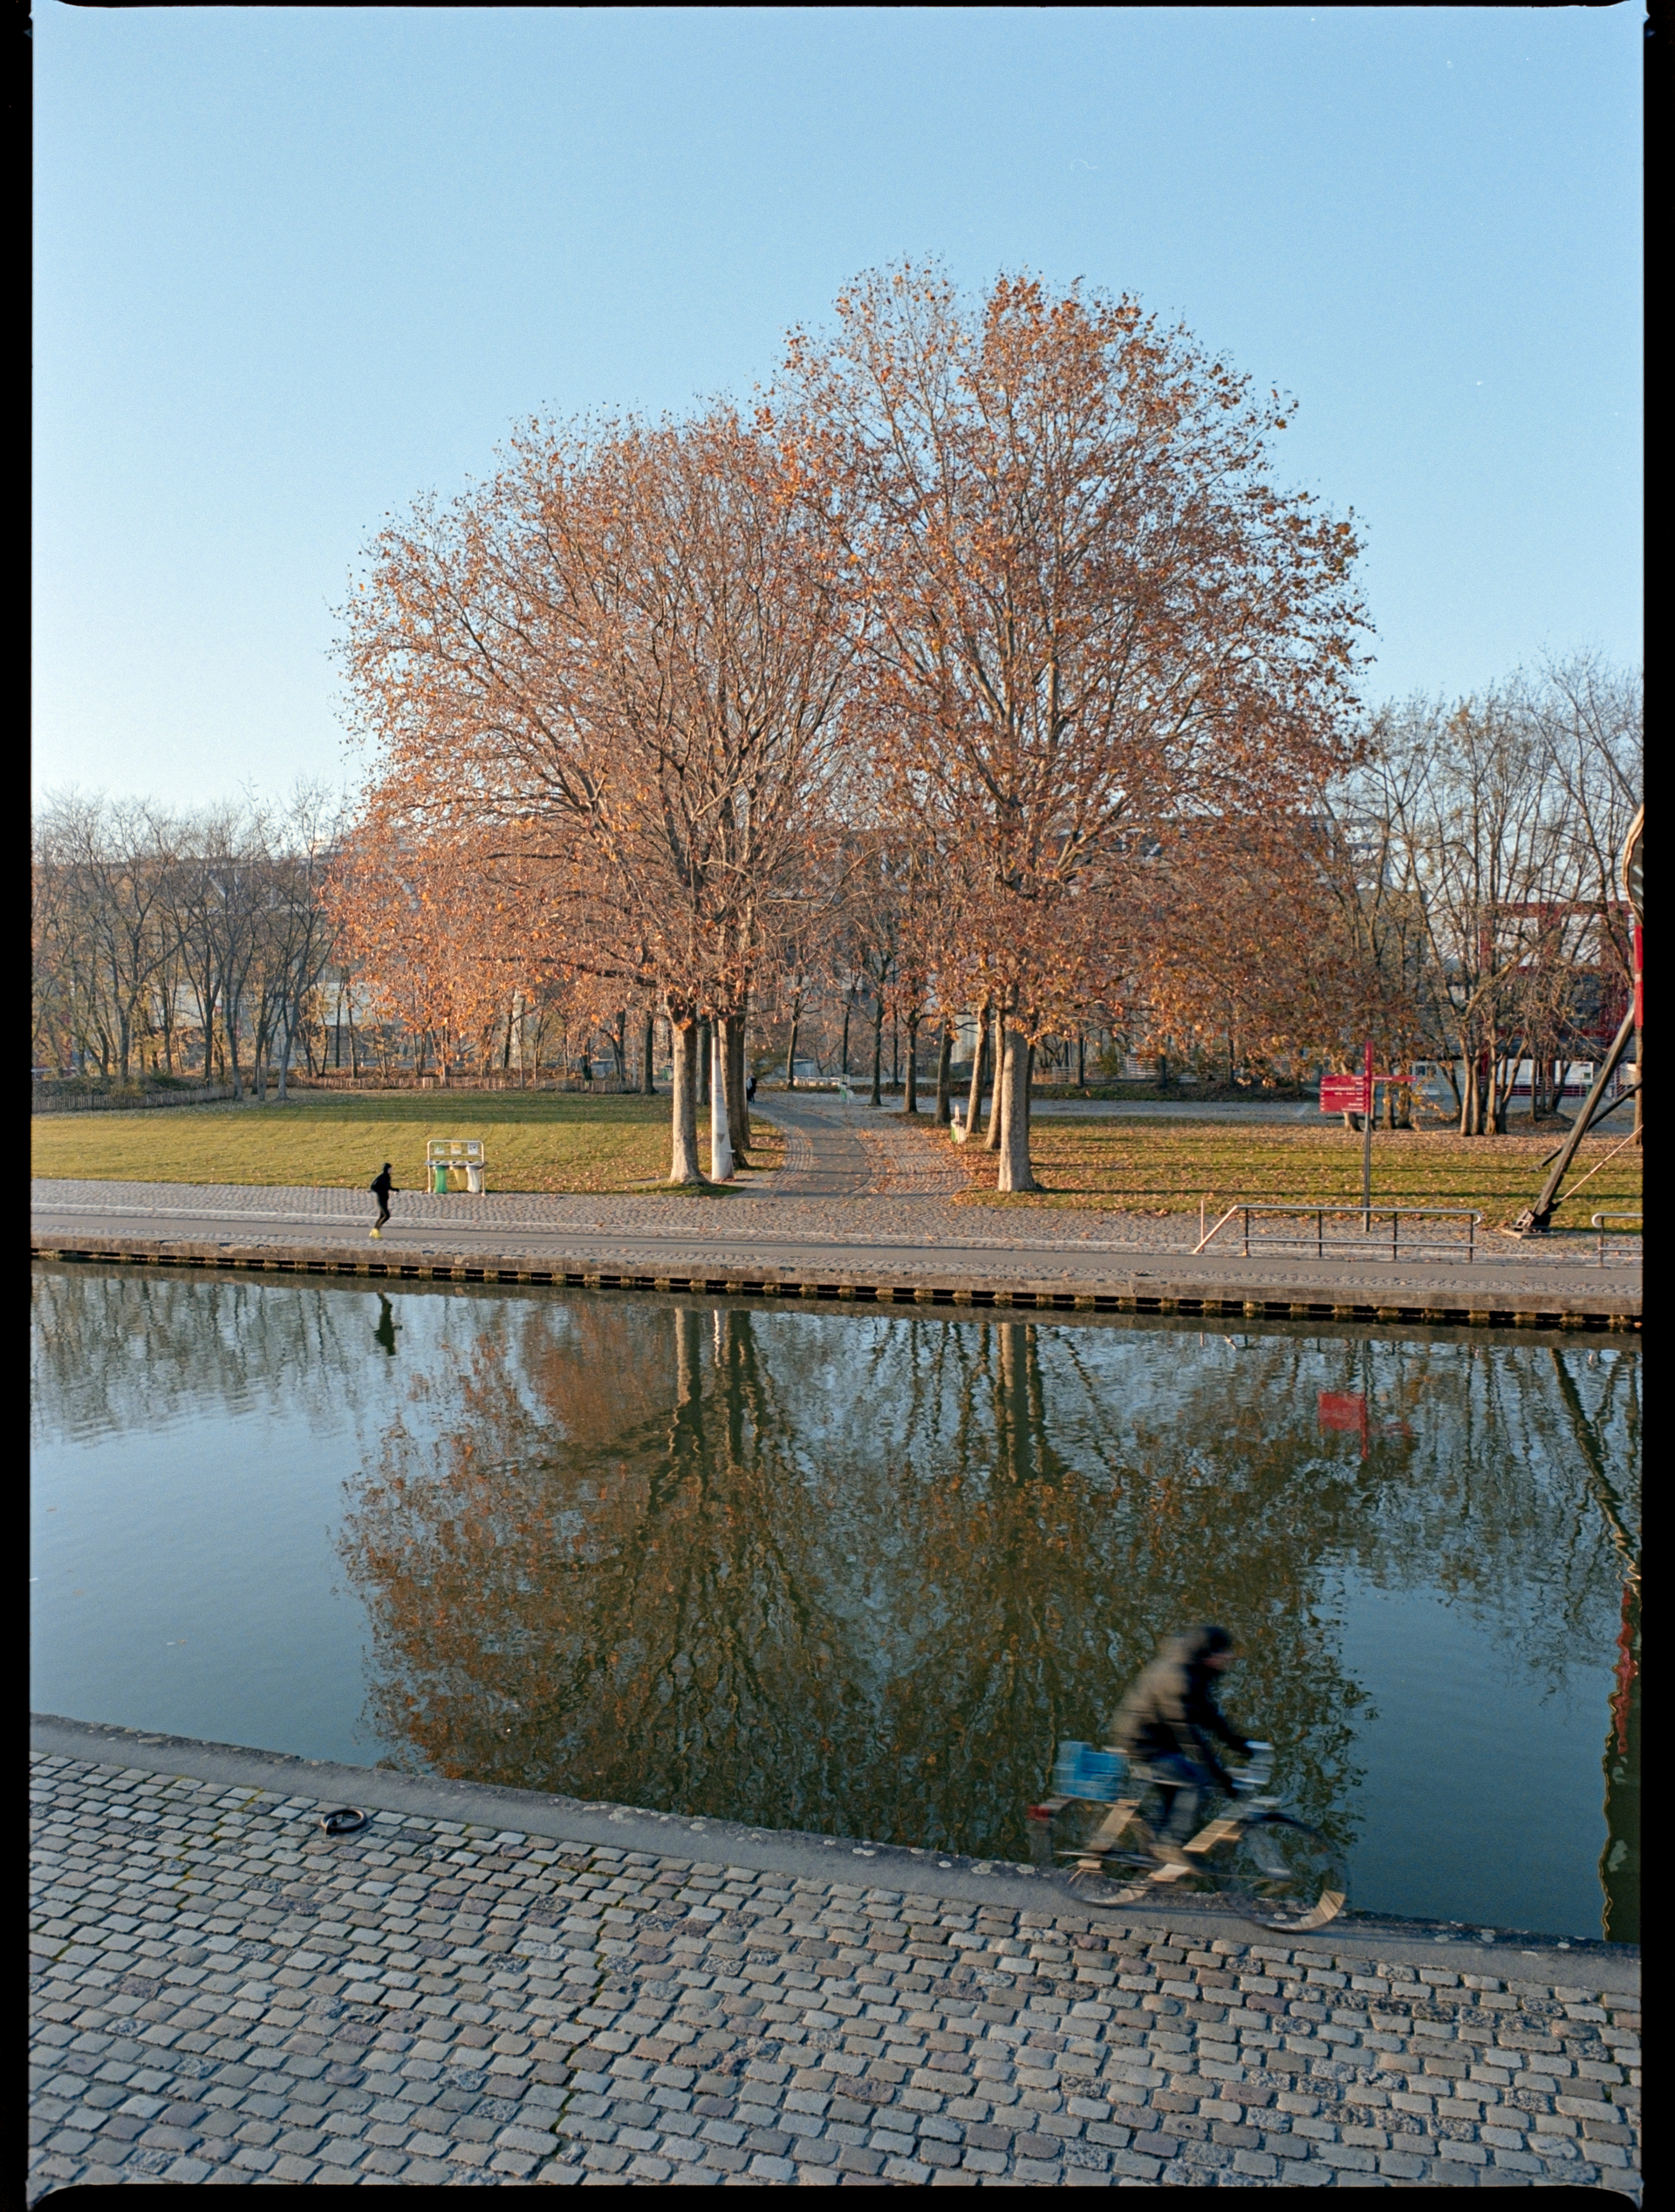
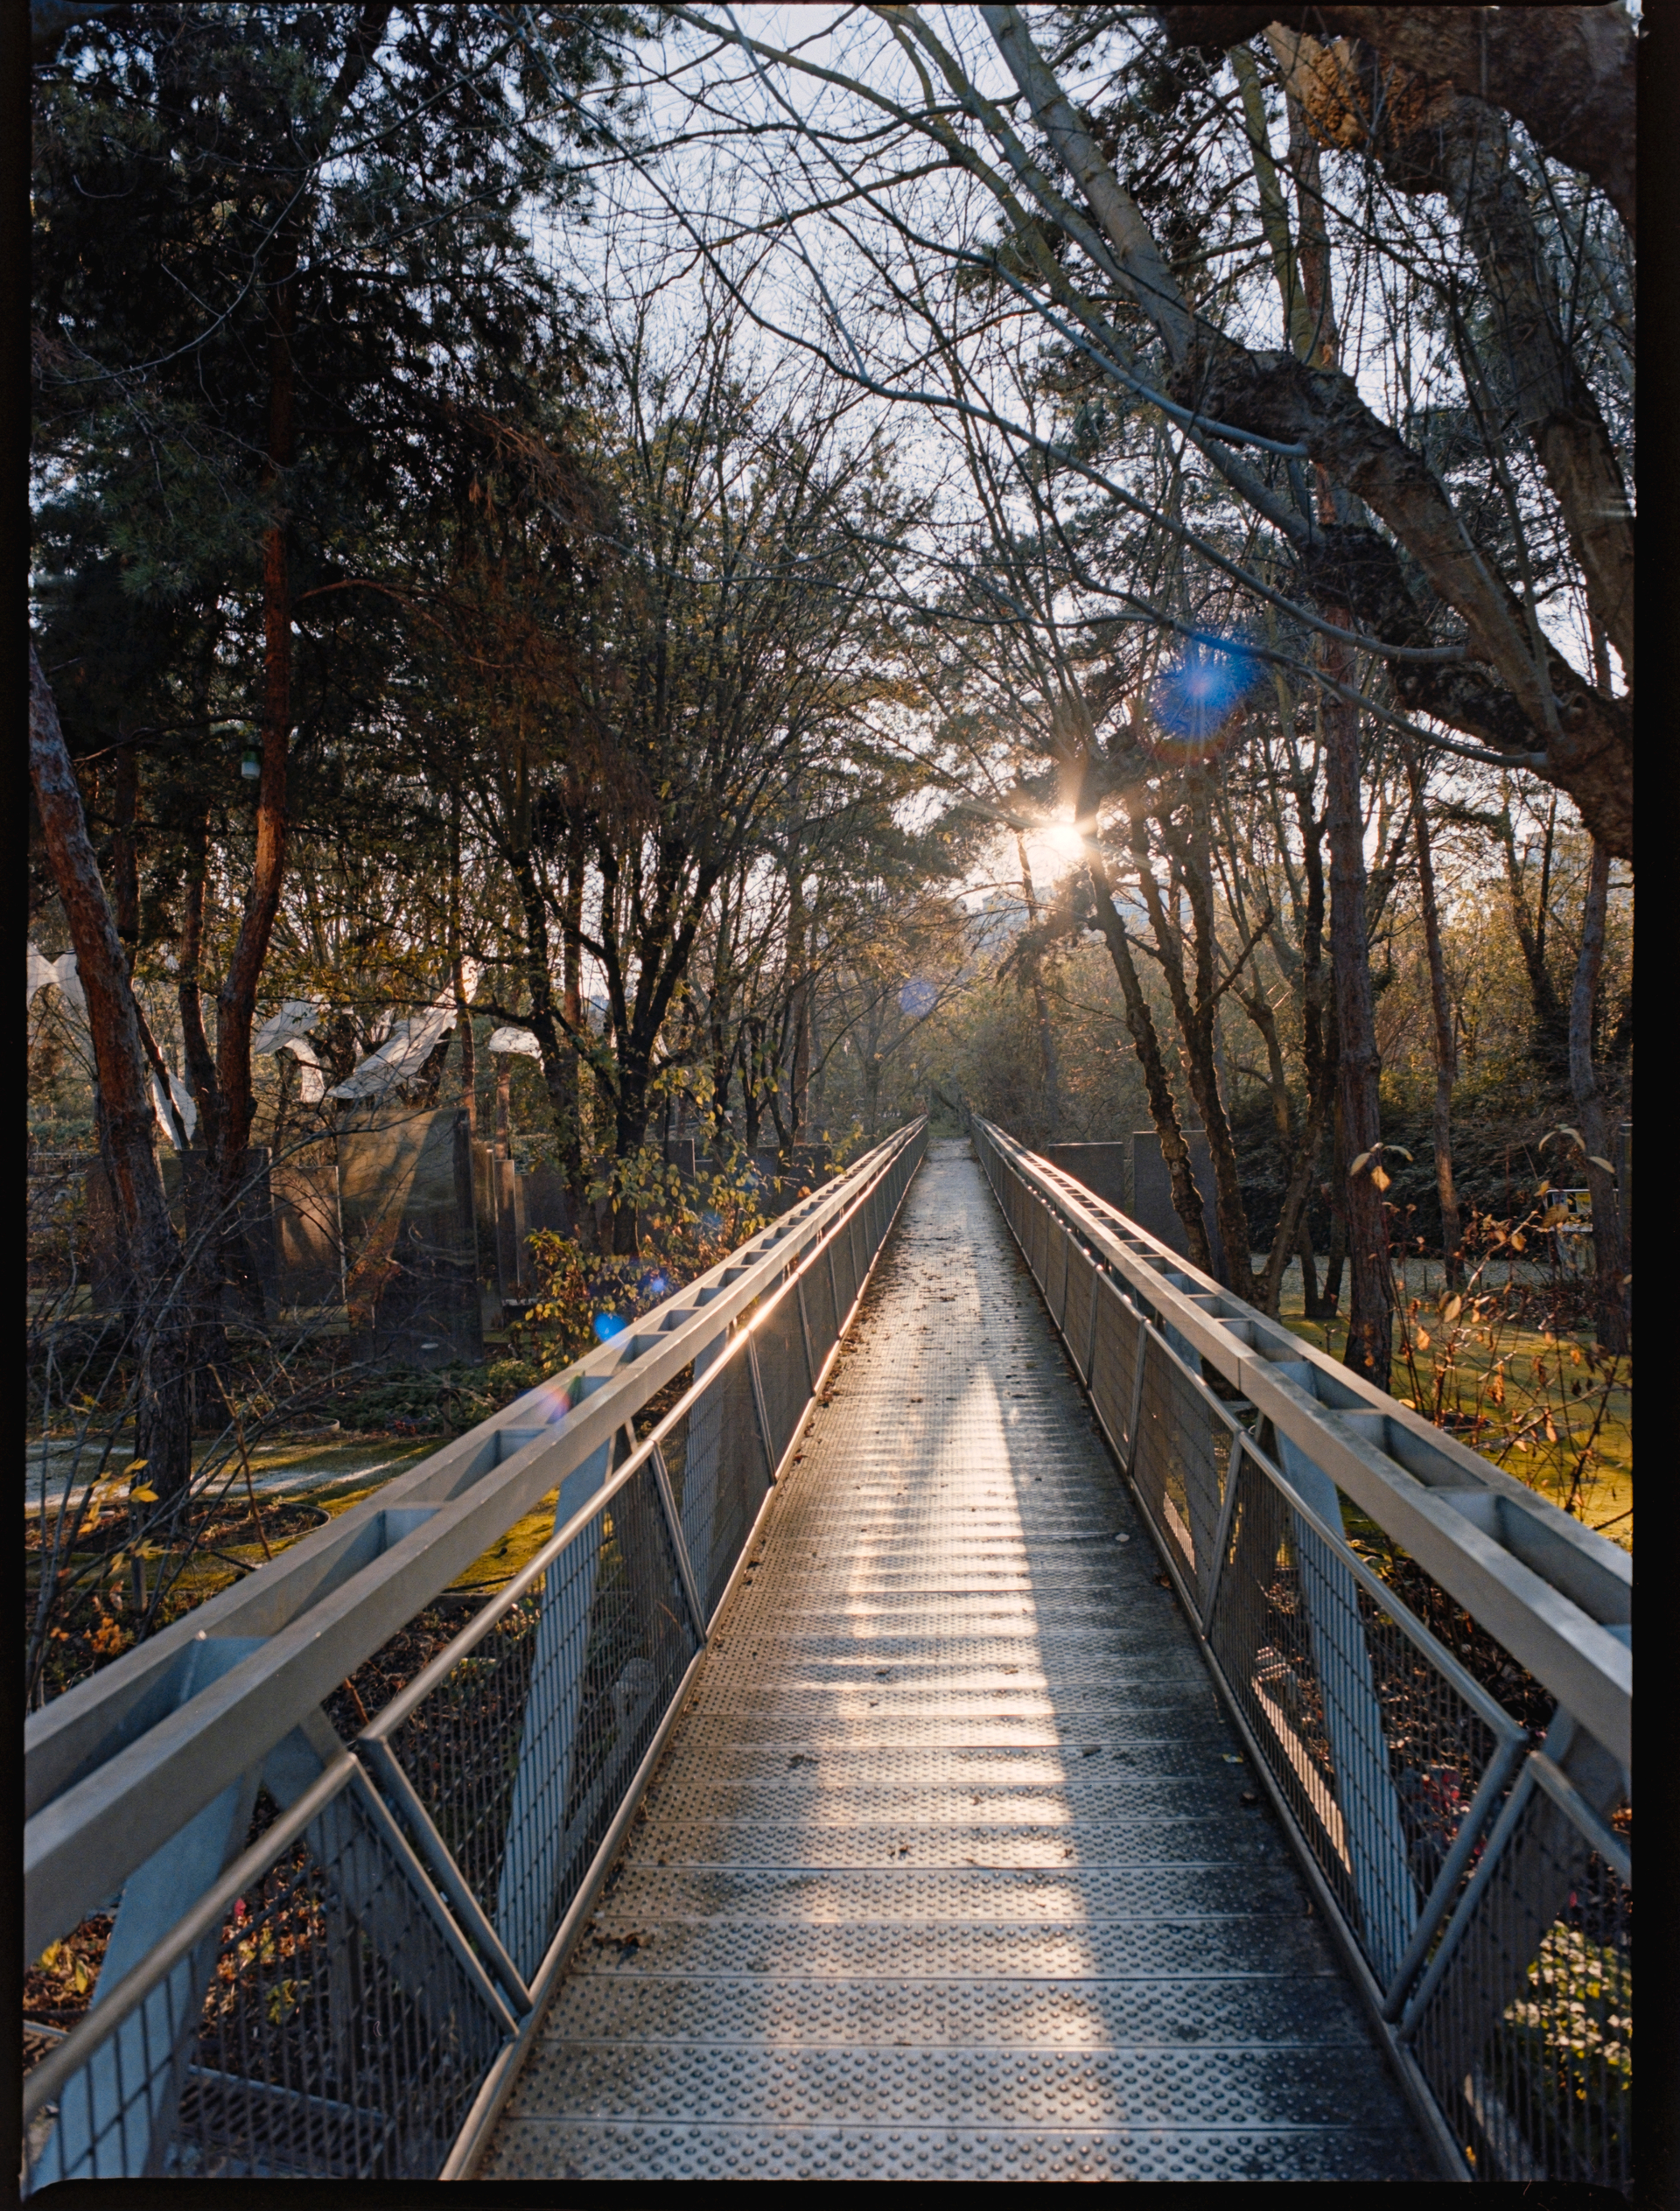
But for the outdoor shots (with the exact same conditions, camera, lenses, Portra 160 film, etc.), it has been IMPOSSIBLE to get anything consistent, even using “Roll Analysis.” None of the photos come out homogeneous, and I end up with way too many different tones (see Dropbox link below – Roll Analysis On, Basic, NLP Neutral, Engine Settings set to v3.1+).

I’ve rescanned this roll three times, and the issue is always the same: sometimes I get a blue cast, other times magenta, pale yellow, neutral, or overly contrasty. I can’t manage to bring them in line one by one. Yet when I look at the negatives, they seem quite homogeneous overall – maybe 1–2 are slightly over- or underexposed, but nothing major.

Am I seriously missing something in NLP? I feel lost.

I’ve uploaded the RAW scans to Dropbox and some JPG export in case it helps anyone take a closer look:

Test 1 folder : Roll Analysis On, Basic, Setting NLP Neutral, Engine Settings v3.1+
Test 2 folder : Roll Analysis Off, Basic, Setting NLP Neutral, Engine Settings V3.1+
Test 3 folder : Roll Analysis On, Basic, Setting NLP Neutral, Engine Settings V3.1+ (just removed a few RAW basic settings on the files like Lens correction)

Thank you in advance for the help.

When posting about Image Conversion Issues, please include the following information:

  1. Which version of Negative Lab Pro are you using? NLP V.3

  2. If using DSLR scanning, please include:

  3. camera make/model : Fujifilm X-S20 + Valoi 360 full Setup

  4. lens make/model : Fujifilm X 60mm f/2.8 Macro

  5. light source make/model Cinestill CS-LITE with the Cool tempurature for NEG

Let’s see…

NLP converts images based on their tonalities and colours. The more variety we get in both aspects, the easier and consistent the conversions will be, normally.

Here, we have takes that are relatively monochromatic (I’m exaggerating to make things clearer) and each of the comparable pairs have been shot (in analog) with slightly different settings. Even though all scans were taken with the same settings, their brightness vary by 1/2 to 1 stop. This, in combination with the relative lack of colourfulness leads to slightly different conversions … which is to be expected.

Due to NLP’s deductive conversion method, variations not only come up with different brightness of the negatives, but often also with what is cropped off, ignored by border buffer settings etc. NLP’s conversions are best thought of as being starting points from where we make our images. Often, conversions are what we aim for and often enough, they need to be worked on. Never ever will we get what we want from all negatives on a roll of film, although NLP is fairly tolerant to differences when negatives are colourful and span a wide tonality.

Screen: Pairs of photos taken of an object from the same position and with slightly different analog exposures. Conversions of such pairs are similar.

I can understand that of course but isn’t Roll Analysis there so that you can choose the conversion that works best for you and then apply it to similar frames, and by that I mean similar in terms of subject matter and lighting on the day you made the exposures on to film? These frames seem to be just that and if the original exposures varied by half a stop or so I can’t see why that would matter, in the darkroom it wouldn’t make a jot of difference to the filtration needed to print them so that they all looked the same.

If Roll Analysis doesn’t do that and still insists on processing the frames differently is there a better way? I’ve read that you save a setup and apply that, or alternatively people seem to miss the ability to ‘Sync’. Is there another way that the OP can get the results they are expecting, and that I would like to see?

I am curious to ask a lab to scan my film and see the result, see how they manage it. And at the same time I am also thinking of going back to take pictures in better condition, because all things considered, the sky was really cloudy and rainy, and I was facing the south, so it might be the reason the light was not good for analog and the facade of the building pale.

but I’d have hoped Roll Analysis to be more accurate when I shot at the same aperture f/8, almost same speed (1 stop above maybe), same lenses (35 or 28mm only) and same Kodak Portra 160.

with pictures taken during sunny daylight conversions are almost mostly good, but with grey/cloudy lights not that much it seems…

Well, maybe someone will help, because in those circumstances when you have achieved a result that you are happy on one frame you should be able to copy it across to all the others without the vagaries of the processing software having another go at processing them. I’m sure it must be possible in fact, it would be so easy to implement, but I’m not the one to tell you unfortunately.

Whether the lab results wil do the same is another matter, that will be automated and it won’t know that you want to keep the colours the same across a group of images.

Just to be clear, and to take it to ridiculous extremes, I’m talking about a situation where you might have a building photographed in a flat light with a limited range of muted colours as you have here. Then a large red lorry pulls up and you take another photograph, then it moves off and a large yellow lorry pulls up etc. etc. In the darkroom this wouldn’t affect anythng as your filtration stays the same. It must be simple to do in NLP?

Roll Analysis helps to complement negatives that e.g. lack reds with reds found in other pictures.

I have (old) rolls of film with negatives that were taken under different lighting and of different objects and find that RA can provide conversions that suit me … and I also find that some rolls are best converted without RA.

I understand NLP as the easy, effortless way to a decent starting point.
This understanding made my life easier.

Thanks, perhaps I’m asking what this person asked back in July:

I also seem to remember seeing a post from Nate suggesting that he was working on bringing it back (why did it go I wonder?). I use the ‘Sync’ option in Lightroom a lot but presumably that doesn’t reach the necessary parts of NLP.

Edit: I think I’m mis-quoting him, this is probably what I saw:

From this thread:

I suppose that if ‘syncing’ includes a specific NLP variable like the border buffer then the colour processing of each frame might still be different.

..and then there is this thread where you describe your method regarding saving a setup, but you choose not to use Match or Sync:

Hi,

Your issue with the outdoor shots is that you had significantly different in-camera exposures at the time of capture (with your film camera) between shots.

For instance, here are the exact same settings applied to both images. And yet the result is quite different.

On the image on the left, your analog camera exposure was probably at least a full stop higher than on the right. If they were the same exposure in your film camera, the result would look exactly the same.

You can see this in the original as well (prior to conversion). The image on the left is significantly denser (more exposed) than the image on the right.

Remember than the response of film is not linear. So increasing the exposure you will also see some slight differences in tonality and color rendering.

Still, using Roll Analysis, these two are very close (with just with a tiny bit of exposure and brightness adjustment).

But yes, if you shoot very different exposures (for instance, by having auto-exposure on or by bracketing in the film camera) you will see some variance in the result. This is also true of lab scans, by the way.

Hope that helps!

-Nate

1 Like

Hello Nate,

I shoot manually with my Nikon FM2 and with two different shift lenses and Portra 160. Basically I was always at the same aperture f/8 and speed, around 1/30, maybe on a shot or two I forgot to reset my aperture from f/2.8 or f/3.5 back to f/8, but most of them are mostly the same settings.

I don’t have a problem with exposure nor contrast but mostly with colors.

The indoor pictures I am referring to are the following taken with the exact same lenses aperture of f/8 and speed between 1/4 and 1/8s :

I will try again to make a roll analysis but still, for the outdoor picture it is a real struggle.

I don’t except 100% of the pictures to be consistent, I know it is impossible with analog photography, I was expecting maybe 60-70% but on my roll each pictures are really not similar despite the same conditions and settings, taken during the same hour (even less).

The colors are really different in my eyes, on the left very blue, and more magenta on the right though the light is the same.

It looks the same but it’s not and it is very difficult and long to work on each picture individually without being able to sync (because if I do, it’s going to be a mess like fully blue or something) or to have a reference picture aside to be able to edit with more consistency.

I know how tricky and difficult it might be to develop NLP, but I was just wondering if by converting my RAW files you were facing my problem the same way or not, that’s why I shared my files. Maybe it’s just my film Kodak Portra 160 that reacted like sh*t with this cloudy rainy day light.

Anyway, I shoot yesterday morning again with a crazy beautiful sunny daylight with big blue sky and the sun on the left facade and dropped my film to a lab for developing so I can’t wait to see the result.

Re-ran the series again, this time with DNGs exported by DxO PhotoLab 8. Here’s what I got:

Each group from left: the negative, converted with Roll Analysis, converted without RA

NLP 1st tab setting: Basic, Pre-Saturation 1, Border Buffer 25%
NLP 2nd tab setting: Standard, but set for soft highs and lows plus B and W Clips at -10
(these settings produce neutral and low contrast images that are well suited for further tweaks)

The results are consistent to what I’ve come to see from NLP and to everything that has been written as replies so far. Nothing wrong with NLP imo, just not what you expect @SimonGR

As for Portra: According to Kodak, the film was made for portraiture. A different film stock might be better suited for architecture.

The most intriguing difference can be seen here:

Converted with the same settings as above…plus the one at right with Pre-Saturation = 5

The opper row shows considerable variations. The lower row differences are less pronounced. Looks like the person present in the first shot has added some magic to the photo…

Still intrigued at the difference between Roll Analysis and Match. As far as I can see there’s nothing about Roll Analysis in the main Guide accessed from the menu bar above, but there is something on Match relating to v3.1, it’s in the section on Batch Editing and on the face of it does what I’m looking for, perhaps it does what @SimonGR is looking for:

MATCH (v3.1)

What if you want the EXACT same CONVERSION and EDIT across two or more images?

That’s where “Match” comes in handy. It copies both the image analysis and the NLP settings from your master image to your other selected images. This not only allows you to have the same exact conversion, but also to continue editing the negatives in the future using Negative Lab Pro’s controls.

Note: You may be tempted to use Lightroom’s own Sync Settings tool, but this won’t bring over the internal metadata that Negative Lab Pro needs to allow you to continue editing the file in the future.

… and this is what it gets …

… when the “wrong” image is used as the master.

I simply think that it is - due to how NLP works - impossible to get images with consistent a.k.a. similar colours, tonality and lighting.

Yes, I’ve been trying to edit batches of pictures, according to the main subject and condition, I still have to give it a new try.

Among all films and by experience usually Portra 400 is the best to use when shooting architecture, sometimes a bit other exposed to have more neutral contrast’ it has always worked for me, it’s one of the most consistent film. But oh well, prices have increased so much after COVID, I’ve been trying Portra 160 and it has this kinda pale magenta in the highlight. Might go back to Portra 400 despite the price… that’s for 135mm, but right now I’m trying different 120mm with my Mamiya 645, I’ll see what film is best suited.

Thank you all for your answers, I’ll try to figure out something with what I’ve done on this roll, being inspire by your different tests. And also keep in mind from now on to cancel analog shooting when it’s raining and choose light and sunny day to avoid bad surprises ahah.

Been scanning and converting with NLP some old Portra 160 taken during autumn light in Paris a few years ago with my Mamiya 645, and light is gorgeous. Sun is really the best.

1 Like

Thanks for trying that out. On the face of it that is more what I was looking for so ‘Batch’ may be the method I would choose first of all to review the ‘scans’ from an entire film if I was doing that. It looks to me as if in particular there has been no correction for the significantly different exposures on the film that Nate pointed out, and so is useful in the same way that a contact sheet might be.

When I was printing in the darkroom the ability to do contact sheets from colour negative easily was the luxury I miss most now with the digital workflow. I’ve done them either by photographing the film in transparent negative sheets on a largish lightbox, or on a ‘transparency’ scanner in the same way but in two parts. Neither method is something that I look forward to doing now.

So from a ‘contact sheet’ like this you can use NLP to produce results that exceed the possibilities that you had when simply printing on paper in the darkroom so I’m excited by that, I’ve just got to learn how to do it!

What I do when I want a “contact sheet” is the following:

  1. Create a VC from each image and convert VCs with e.g. “Basic” at very low presaturation
  2. Create a VC from each previous VC, reset and and convert with only ONE setting changed
  3. Repeat step 2 until done

I often give VCs a rating (1 star for the first set of VCs, two for the next etc.) for sorting. Undo stacking before sorting by name, rating, colour label etc. Sorting helps to compare (shortcut: C) or show a few images next to each other (shortcut: N)

Instead of setting WB and crop, I often use auto WB and set border buffer to e.g. 25%.

If I want to see two dimensions, I make physical copies (and rename for Basic, Frontier, Noritsu) and then convert with stepping through presaturation.

Using VCs saves a lot of disk space, but be aware of the fact that info about the VCs is in Lightroom’s catalog only and not in the sidecars. For transfer to another computer, create a catalog.

Thanks for explaining that, that looks very good, particularly for quickly comparing results of different treatments as you often do for us all on here.

1 Like

You can see on the negative itself that there is a really BIG difference either in the original capture exposure (from your FM2) or something during digitization (like a different light table brightness)

With film, your colors can change with exposure levels. Even normalizing for exposure in post, you will still not get the same colors when you have a large difference in film exposure.

This is a well known effect of film.

Again, this just shows my point that these have very different exposure levels when they were captured in film…

1 Like