Integrating sphere as a uniform backlight

One thing that might prove useful in this discussion is a method to determine whether a given scan is more “correct” than another. As anyone has who has tried to scan with high CRI white light has discovered, if you simply try to invert such a scan and then white balance on a neutral area, you will generally find that there are magenta or cyan tinges in the highlights or shadows. However, given the theory behind how the orange mask works in negative films, this shouldn’t be the case. The entire purpose of the orange mask is to ensure that the color channels in the resulting projected image are properly “parallel”, ie you don’t need a per channel gamma adjustment to correct the color. This last bit is exactly what NLP is designed to correct. It tries to figure out a curve it can apply per color channel to get everything back into alignment.

My suggestion for a test to determine “correctness” is actually pretty simple. You just have to scan a negative of a greyscale step wedge from white to black. If you don’t have one, just get a neutral step wedge and take a photo of it under controlled conditions, but a lot of color calibration slides include exactly this type of step wedge. The values in the wedge don’t even have to be truly neutral, as long as the shade of grey is the same for each step (only the tint changes). A “correct” scan of a photographic color negative will exhibit the following characteristics: when inverted and white balanced on any patch, all of the patches are neutral. So if you balance on the middle patch, the lightest patch and the darkest patch will all have equal color values in all three channels. If this isn’t the case, then you need a tool like NLP to correct the color channels.

Hi,
I recently put together a rig with the first prototype of my Integrating sphere, which I initially used to test the color rendition for my DIY scanner but later discarded in favour of a much smaller integrating sphere with condensing optics. This is 90% built out of left over parts with the exception of the white flange tube that cleans up the rough hole I made in the enlarger base board and the bellows unit I bought on classified listing. The column is from a durst enlarger, the aluminium profiles where leftover from another build.

As the board would be raised to accomodate the sphere, I opted to cut a hole for the column, to mount it from underneath as well and bolt it to the aluminium cage which largely reduces vibration. This works because I don’t need THAT much working distance

I apologize for the bad photos, this was just intended as inspiration for someone who might want to use a vertical setup. Seeing as I have all 4 colours of LEDs(mine also have a 850nm IR LED) on every starboard/MCPCB all colours are shining from multiple directions. This not only favours heatsinking, but I can also get away with a fairly large aperture/sphere ratio while maintaining a very even illumination. I also have a piece tempered glass, ground on one side which I intend to place on the aperture, when needing a surface to rest negatives on. The linear slider is a heavy duty domiline 80 slider I found for a song on eBay(thanks to a typo in the name) and I printed a new nut with a pulley profile alond with a cut piece of acrylic to mount a regular stepper to. As a lens I intend to use the large Scanning nikkor(from the Coolscan 8000 series). I already have adapters to adapt it to my M42 bellows.
image

While I completed this build 4 weeks ago, I haven’t had a chance to test it yet, as I don’t own an interchangable lens digital camera. I’ll post some results if I can loan one off a friend.

Hi all, and specifically @damien who started this excellent thread:

As described above, I tried to “cheap out” and go the easy route by using a cheap Ulanzi RGB light, but after testing found the following:

  1. The Ulanzi is not sufficiently adjustable in terms of color to properly cancel out the orange mask and turn it into neutral grey.

  2. The Ulanzi has a combination of RGB leds and “warm” and “cold” white LEDS, which leads to insufficient coverage of a 24x36 mm^2 frame, leading to (slightly ~ 10%) reduced brightness at the edges of the frame. While this seems ignorable to, say, a one stop or more vignetting in many lenses, it does create havoc with dark B&W scenes when these are inverted with NLP.

These two reasons led me to search for a better sulution. I am still convinced that clean, separate, small spectrum R, G, and B lights are best for scanning, because:

  1. The orange mask blows the red channel of a DSLR into saturation before blue and green are even halfway, which creates non-optimal resolution when scanning.

  2. For correct scanning, imho, one needs to probe the densities of the individual C, M, and Y layers in the film, and this is best done with small spectrum individual R, G, and B scanning as opposed to white light, which also probes overlapping color ranges, as discussed above and in many of the literature.

Hence, decided to push a little bit further in finding a good light source with individual R, G, and B LEDS, which can be individually tuned to balance out the orange mask, and secondly, one that has sufficient area coverage for homogeneous lighting of a 24x36 mm^2 negative or positive.

After some digging, started to put together the following:

What is show in the photos is a work in progress (red light, green light, blue light and white light, although my cell phone auto white balance distorts the colors somewhat): An 8x8 (=64) RGB LED matrix, in which each LED has an individual R, G, and B LED inside plus a little processor, that can be controlled through a WS2812s protocol using an Arduino UNO board with some code inside. I used one potentiometer to regulate overall brightness, and three RED, GREEN, and BLUE potentiometers. All this can run stand-alone from a 5V power supply. It took me one afternoon to put this together and code it. Total cost of parts was around 30 euros. The matrix is about 65x65 mm^2 and with a diffuser in front, and mounted inside some internal reflective box (I’ve ordered a square tin can…) should provide homogeneous lighting of 24x36 mm^2. As in Damian’s setup above, the R, G, and B are individually tunable to neutralize the orange mask, but I won’t need an optical sphere this way, keeping things nice and compact.

I’ll post more later once the project has finished and report on my further findings…

1 Like

Indeed the halogen boulb are effectively 100%, but they are also very warm… almost orange, and that’s not great for negative masks, I’d look in to colour correction filters.

The built in filters can correct casts but also create colour specific casts that are hard to fix, colour correction is better done in post. You can increase contrast a bit with B&W if you use a green light.

Still putting together my new setup, taking longer since I decided to also overhaul my rig based on some issues I found in use, but the best read up that I found that summarizes all/most there is to know about why trichromatic scanning is better than white light scanning can be found here:

3 Likes

Actually, not all halogen bulbs are that warm, mine is 5200K, so pretty much daylight balanced. I need to sometimes play around with the built-in filters in the enlarger head, because I should, in theory, be able to counteract the film’s orange mask with them.

I had tested filtering with a Durst M605c enlarger as light source to compensate the mask. The resulting conversions were fairly similar to what I got without the filters and therefore decided that compensating is not worth the effort. Masks vary widely too, which makes adjusting cumbersome.

Nevertheless, YMMV and might be worthwile.

Hi all,

An update from my side: My custom RBG light (above) that was under development is up and running, including an overhaul of my rig:

I purchased a simple metal box that has a 55x55 mm^2 opening in it’s lid to mount the light:

The opening will allow for 35mm and MF scanning. A metal box, since the RGB matrix will get hot in use, and internal reflections will help getting the output up and homogeneous.

Mounting process and tests plus adding an opal glass diffuser (pics speak for themselves):


Ready and final test:


Mounted in upgraded rig:


Rig can be on a tripod, but simply on my desk is more compact and convenient.
Rig uses Nikon Df with 105 2.8 macro with AF calibrated at 1-1.1 magnification which enables AF on each shot. The 105/2.8 lens has two threads: An aluminum hood mounts on the 62 mm outer thread, which is static, while internally the inner tube of the lens with 52mm thread can move in and out freely to focus. The hood has a front thread of 67 mm, on which a reducer 67-52mm is mounted, followed by a stack of lightweight 52 mm rings (from Nikon macro extension tubes from the 1960-1970 era). This stack is ended with an old 52mm filter from which the glass was removed, which then adapts to the bellows of a Nikon PS6 slide copy adapter. The camera can be moved up/down and sideways to align. The custom RGB light is mounted at the end, and can slide back and forth to adjust the distance. A custom “duster” is created from two record player antistatic carbon fiber brushes.

Tests showed that indeed the light provides a homogeneous intensity across the 35mm frame. R, G, and B, and overall intensity of the light are individually adjustable, and are adjusted (after the light has warmed up and is stable) to create identical R, G, and B peak position and amplitudes in LRC when the light is shining through a blank part of a color negative and imported into LRC using a custom linear profile for the camera, which was created using Adobe’s DNG profile editor. I also looked with RAW digger at the RAW data, and also there the peaks are at the same position and intensity. The bandwidth of the R, G, and B LEDs are “quite narrow”. Camera white balance is either set at 5560K (daylight) or a custom WB on the light shining through a blank part of the color negative (this doesn’t seem to matter much). The imported scans are then cropped to remove non-picture areas, “auto” tone is hit in LRC while the picture is still not inverted to balance exposure levels, but “vibrance” and “saturation” adjustments from hitting “auto” are nulled to keep everything linear (i.e., only exposure is adjusted, while color balance is retained). The picture is then manually inverted by inverting the tone curves for the R, G, and B channels, while throwing away regions without pixels. A white balance is not required this way, nor is NLP (sorry). This is fast, and no further color interpretation is made since everything is kept linear (NLP wants us to set a white balance on the film border and makes non-linear inversions in the R, G, and B tone curves, which shifts color balance non-linear as far as I can see). @Nate: Please correct if my impression is wrong here).

My intent was to do everything as objective as possible (i.e. without making colors “look better” by changing the balance in a non-linear fashion), and therefore keep everything linear after I negate the orange mask in hardware with my custom RGB light, in order to let the specific tones of a used film stock come through. So far I tested on Portra 160, Portra 400, and Ektar 100 film, and indeed, the specific tones that Portra is known for seem to come out, as well as the specific bold colors that Ektar is known for. I was struggling with NLP and alternative inversion software because of the many different color interpretations of the same picture that were possible, which all might look okay or good, but I had a hard time deciding which looked best. I am well aware of statements that there is no “correct” way with color negative film, and that the color balance is a personal interpretation, but by keeping everything linear in the inversion process, and using the custom light to balance out the orange mask, I do see brilliant colors now that seem to represent what a specific film stock is known for. Whether this method is entirely correct or still an “interpretation” I don’t know.

To my surprise, I do not need/want any inversion software any longer. Manual inversion is (for me) faster since I do not have to decided between the many possible options for interpretation, and since I believe it is more accurate to extract the specific tones that a given film stock is known for (but I might be wrong). I still use NLP for B&W since it creates beautiful tones for that, but for color film, I now stay away from inversion software because of color interpretations that are outside of my control, and possibly more subjective than I can do manually while keeping everything linear. The only subjective part in my current approach is the exact position of the ends of the curves in the tone curve editor to remove a slight color cast in the shadows or highlights if I see that visually, but the curves remain linear.

Thoughts and comments welcomed…

Hi all,

A short update here. Folks have asked me whether I could show pictures of the negative and the inversion to see how manual conversion works out, so here goes. First pic is as scanned photo with my custom linear camera profile as per above post, second picture is the result of manual inversion while keeping the tone curves linear as per procedure described above, third pic is the inversion from NLP V3, settings: Basic, NLP standard, and Lab standard, keeping everything default and pressing okay (not doing roll analyses here).

Kodak Ektar 100:


Kodak Portra 160:


The manual pictures are a bit “flatter” but that is easily improved with the brightness sliders in LRC taking care only to affect brightness, contrast, highlights etc, without distorting the color balances. NLP seems rather “off” with overly red boosted tones and cyan skies. Let’s have a look at some tone curves then. Manual first, NLP second, blue channel shown but R and G are similar:


Note that these are quick edits without further ado to make the pictures look “nicer”. Just objective linear manual conversions versus what NLP creates with some default settings. Can both methods do better? Sure, perhaps the street shot manual inverted is a tad too pinkish, perhaps these are typical “Portra-look” tones, but I do not know what settings to use in NLP to get better results, while in manual I have full control and know what happens.

Perhaps NLP doesn’t like small bandwidth R, G, and B scanning and is optimized for high CRI continuous light scanning, Perhaps this manual method only works for me and my custom RGB light. I don’t really know. Perhaps Nate can chime in here. For now, however, I found something that works very well (for me) and achieves my goal of being as objective as possible in the inversion, and I do like the colors that come out of it a lot. For me it’s also (much) quicker than any inversion software since I don’t have to choose between many, many options and color balances that depend on which buttons I press, since I can never choose the one I like best, since there could always be a “better” looking option by using different buttons.

I still use NLP for B&W since I love the tones that it automatically creates with Linear Gamma on a well exposed negative, and I even considered purchasing X-Chrome for when I start from digital color files, but NLP for color negatives? Nah…maybe not anymore…

Hi. I‘m using ws2812b based discreet narrowband scanning for nearly two years now in a semi-automated DIY setup. If I remember correctly the most important changes to procedures were a) balancing out the light already in the physical domain (doing one calibration per roll in practice), b) selective channel extraction eliminating crosstalk and c) keeping hands off any per channel black/white point.

Thanks for sharing the pictures, Arno.

I have played around with a few samples users have sent me from their custom RGB lights, and the results were much more natural then the results I see in your post. But this could be due any number of factors.

There are a few parts of the NLP pipeline that are optimized for high CRI white light. Mainly, because high CRI white lights are readily commercially available. Particularly, the “color model” section adjusts the “primary” calibrations in Lightroom. So this is something I could potentially improve with calibration, and any raw files you’d be willing to send to me at nate@natephotographic.com would be most helpful!

The nice thing about using NLP even in this scenario is that once you find a group of setting you like, you can make that your default starting point, and from there it is easy to make mathematically precise adjustments to the tone curve with very little fuss. It gets incredibly complicated to try to make the same adjustments by hand on the tone curve… for instance, good luck creating a precise gamma curve for color adjustments, and then keep that same color balance as you add or remove contrast on the curve… it just isn’t possible to get the same level of control by hand as you can using NLP. But I understand that everyone has different goals in their process!

-Nate

Hi Arno,
congrats on your rig.

I’m chiming in to second what Nate said about the “naturalness” of these Trichromatic scans. They don’t look right to me either. While the spectra of your RGB LEDs are probably not ideal from a purely theoretical point of view (I have yet to come across non-custom combined RGB Leds with 440nm for (Royal) Blue AND 660nm for (deep) Red), the fact that you are using them in “single-shot” scenario will further compound the issues, because the closer spectral peaks of the LEDs will increase the “crosstalk” arising with your camera’s CFA. As an example, the skin tones of the people in the shot with the “backpack” look way too green in the negative/purple in the conversion. This is likely being caused by the green photosites picking up some of the red light.

As an experiment, to test this hypothesis, I would suggest you use the shot with the pedestrians,expose the image 3 times, with only one channel on at a time. You can then use a RAW processor to extract one channel from every image, merge them into one and white balance off the sidewalk. That should give you an idea of what a “Neutral” representation would be.

As an aside I think that the true key to trichromatic scans is automation. I say this having spent the last year building a DIY film scanner and having scanned thousands of frames over the summer. You seem very competent and based on my experience I would suggest you look into automating the merging of three files, for instance with dcraw and/or imagemagick

Hi Arno,

I second on what Nate and Arno say here… There is no way around going the extra mile here. Especially when using a regular bayer sensor camera.

As I am using the very same LED backlight I can assure you the wavelengths are a very good match indeed. BUT only as long as your are treating your camera like a densitometer. That means

  • three shots of the same negative while illuminate with pure red, green and blue backlight in sequence
  • take red channel from red image
  • take green from green
  • take red from red
  • combine

Ideally you would calibrate backlight intensity of the three shots to already receive a somewhat neutral image after combine. That way you can have your camera shooting away with fixed settings. No auto-exposure means more consistency in results.

And keep hands off any auto-magic. No auto-levels, no curves on any of these steps. Once you have a rather neutral combined .tiff let us go from there…

Hi all,

Thanks for all the inputs. Argh, things were supposed to get simper, but now I’m told to take three separate shots for each negative…wonderful and much appreciated feedback though!

I’m still trying to grasp the details of what I’m doing, and deciding whether I’m on the right track, or whether I would want to get back to continuous daylight and make life simpler. I started with a Solux 4700 K bulb, and those results were not too crummy after all, lol.

@nate : Thanks for being responsive and the feedback. Much appreciated! I will certainly share some raw files for you to look at also. I just want to ensure that they are useful so as to not waste anybodies valuable time.

Here’s some more background of my findings. Maybe it will trigger some more advice on whether I’m making more errors in my approach:

  1. I used my cheap “Hand Spectrometer” to get an idea of the wavelengths of the RGB matrix LEDs. If the wavelength axis of the spectrometer is correct, I find blue at 470 nm, green at 520 nm, and red at 620 nm. Bandwidths are not readily determined with this little tool. From what I read, this is a tad high for blue (ideally more around 420-ish?), and too low for red, since red lands smack in the middle of the orange mask and should be ideally closer to 700 nm to be well beyond orange. Alas, I cannot change that unless I source a different LED array, but these things are a bit lacking in specifications, or source three individual LEDs with known wavelength and use an optical sphere, which would require a new light build from scratch…

  2. To get an impression of the LEDs bandwidths, I can look at some histograms.

I balance R, G, and B by shining through a blank part of the negative and turning the knobs until the peaks overlap when looking at the file in LRC with my custom linear profile. This looks for Ektar 100 film like so:

To me, this looks nicely sharp. Using Rawdigger, i.e. without any profile, this looks like so:

2023-10-18-Light-test-39-Full-4940x3292

I did notice, contrary to what I wrote above from my recollection, that I did do a custom white balance in-camera after I balanced the light though a blank part of the negative. If I tell LRC to do a daylight white balance on the same picture, I get this:

I repeated the shot after I scanned the entire roll to check whether the light is still balanced, and I noticed a small drift (red has come down a bit):

In general I noticed that if I take sufficient time for the light to warm up (it does get hot), any drift will become stable. I just need to wait a bit longer.

Another thing I noticed is that the peaks I see, are a superposition of what the LEDs generate, plus what the film base adds, which makes sense. I still need to do a peak-width shot on the light alone to see what the LEDs by themselves generate.

Questions:

  1. All this brings me back to whether or not three individual shots are indeed needed: If the RAW data from Rawdigger indicates that the peaks of a shot through a blank section of the film base are perfectly overlapping, as in the Rawdigger screen print above, is there indeed a benefit in taking three individual shots with only R, G, and B light active and combining this in software? Of course it is easy enough to try (and I will), but I’m just wondering if indeed it will help based on reasoning.

  2. @mw79 : That’s a beautiful shot/scan with impressive colors and tones! I’m just puzzled about your comment as to why auto-levels, which supposedly only affect brightness and not color balance, would be a no-no? I’m very receptive to your comment and impressed by your example, but any auto-magic that can be done would be a timesaver, which is mission-critical. Perhaps you’re completely correct and there are indeed no short-cuts, but I wouldn’t like spending hours on each shot either (which is why it would be great to understand how to get NLP working on trichromatic shots!).

  3. @mw79: In your earlier comment you mentioned “keeping hands off any per channel black/white point”, which is basically what I do in the curves box. Are you stating that if I were to do a three-shot scenario, I wouldn’t have to touch these at all?

  4. @mightimatti : Yes, I agree on the too much purple in the inverted manual shots. If that is changed, however, it will mess up the sky and moving it to cyan I believe(?). I suppose my next step will be to indeed try the three-shot approach as everyone seems to suggest. I’m not too worried about combining that in software, but it will be a lot more tedious to scan with turning the knobs each time…unless I automate the Arduino board to do this for me during scanning…

Overall, thanks very much for all the inputs! It seems I’m forever learning! I’m just a bit worried now whether this will be an endless road to optimization, which could trigger me to give up eventually and just go back to white light and NLP with whatever colors that gives me, unless I discover the 36 hour days that people keep telling me about…

Arno

Hi @ArnoG ,

Yes, for now make your equation as easy as possible. So not using NLP or other conversion tools. We are not there yet. You first want to get a clean starting point before any custom editing.

I’m not using Lightroom myself so bear with me for not knowing details here but …

  • Export the three shots as 16bit tiff, SRGB and as neutral as utterly possible. Don’t know if Lightroom supports interpreting RAWs as “linear”. If not, choose something else. Also no curves, no cropping, nothing. The only thing that I indeed recommend at this state is “flat-field correction” to ensure even illumination across the frame.

  • Selectively extract and combine channels - this makes your equation clean, your results predictable, your colors purer.

  • Then let’s look at the resulting tiff. After just swapping black and white point it might look dull because it is close to behaving as a log image. It might not have a good white balance yet but from here on there are known ways to edit. Adjust white balance and gamma to taste. Still no auto-levels or -contrast at this point. We will take it from here and follow post processing similar to how Kodak treated its Cineon film scans for the monitor.

Regarding efforts I would consider this a learning curve at first. After everything is in place trichromatic scans led me to not only better but faster and more consistent results.

Michael

Hi Michael,

Thanks so much for your inputs! Indeed it seems less is more: I did some quick edits on the above figures and kept things as simple as possible and the results look a lot better:


The first picture is the as-scanned negative. The second picture is assigning my custom linear profile and inverting the picture with the curves tool (all channels combined, not setting black and white points in the individual R, G, and B channels as I did before and not touching any “auto levels”). I then set the white point somewhere appropriate in the picture (for example the white in the “backpack”, and sometimes dragging tint a bit from there until the sky looked reasonably realistic, i.e. only adjusting white point by changing “temperature” and “tint”) and adjusted black and white point in the curves tool for the combined channel only, and dragged the midpoint along the line there until it looked reasonable. In the third picture I did the same for an Adobe-provided “Camera Neutral” profile, which seems to give quite similar results albeit a bit more contrasty.

The fourth and fifth pictures are as described previously: 4th is by doing auto levels and changing the B&W points in the individual color channels, and 5th is NLP default settings.

Doing as little as possible, not doing auto levels, and not changing the B&W points in the individual channels, i.e. retaining the color balance “as-scanned” and only doing a white balance and B&W point for all channels combined, provides a much better balance. I do now notice that the “temperature” in LRC getting “out of range” by hitting the minimum value at 2000 K, and my scans were taken “too hot” by exposing to the right possibly too much, so there’s more to have, but at least the “too purple” cast is gone. This all tells me that getting the color balance right during scanning indeed should work, as the results by retaining that color balance seem to give much more reasonable results than going into the individual channels and setting B&W points for each. There’s still too much cyan in the skies, which I could easily remove by using the new “point color” tool in LRC, there’s still some uncertainty in my mind on what represents a truly neutral profile (the Adobe provided “Camera Neutral” gives more “punch” than my custom neutral profile), and I feel that I want to set the temperature slider in the white balance a tad lower than the apparently LRC limit of 2000 K, and I could further tune to remove some “dull-ness” in some pictures, but alas, I’ll focus on scanning now (again…).

Overall, this is quickly moving in the right direction thanks to your inputs and that of others here. Less is more, and I’m actually already quite happy with the 3rd pictures I’m getting now from the “one shot” trichromatic scans. Progress!

Very interesting inputs from all of you! Looking at this, I’m starting to be convinced that I’d have avoided some of my color problems if I had done separate R, G and B shots. I wish I had given this a bit more thought before scanning my 3600 negatives :sob: Hopefully this thread will be useful for the next generation of photo negative geeks :wink: Either way, with this approach, I think that some degree of automation is essential for a large collection.

@mw79 @ArnoG Could you send me some sample raw files from your camera, 3 shots that need to be merged. I’m working on a little browser-based tool to adress the automation of deriving a single 16-bit tif from 3 separate captures.

I’ll share it here as soon as I have demo, but after porting libraw and imagmagick into WebAssembly, I hit the roadblock of not actually having any data to feed it. Still don’t own an interchangable lens digital camera…

@ArnoG

Just looking now at the samples you shared via email (thank you!) and noticed something right away…

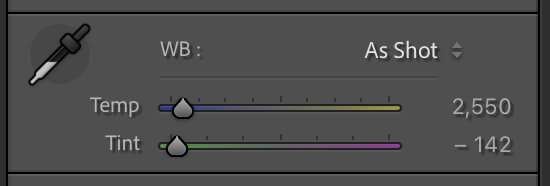
This was the white balance adjustment that had been made in camera… so while you did not adjust white balance in Lightroom, your camera itself had already made a huge white balance adjustment…especially with the tint value at -142!!!

Screen Shot 2023-11-06 at 11.29.30 AM

(So your RGB light wasn’t balancing the negative… your camera was with its auto white balance adjustment. I would recommend setting your camera white balance to “daylight” instead of “auto” when shooting so you can adjust the RGB from your light source without interference from the camera…)

In any case, if you set the the WB in Lightroom to “Daylight” (or simply 5500K on tint, and +10 on tint), you should get much better conversions…

In fact, I’d recommend that across the board for when you are using RGB light sources. There is a technical reason for this that has to do with the way that white balance is working under the hood in conjunction with the camera profiles. But if you try it out for yourself, you should see a major improvement.

Here are the straight-out-of-NLP conversions with the white balance in Lightroom set to Daylight prior to converting.

My default preset in NLP v3 is “NLP - Neutral” so that is what I used here, with no other adjustments.

To my eyes, at least, these look significantly more natural than all the previous results shown, and will be easier to fine-tune to get exactly the look you want.

For others suggestion that you need to take three separate pictures to deal with the cross-talk between color channels, they are only partially correct… there is always overlap between the red, green and blue photo receptors in digital cameras, BUT these values are well-known and calibrated inside the color matrix of the DCP profiles. In fact, if you try to combine three separate individual photos, you are more likely to run into issues because you are no longer making use of the proper calibration for your camera’s sensor.

-Nate

@mightimatti There are even more options should you run into trouble. FFMPEG and OpenCV can do the same. FFMPEG is what I’m using for the last years. I’m currently traveling but can also supply some R,G,B triplet later in the week if needed.