Here are the corners @ 200%. I did refocus for each shot to guard against focus shift. I haven’t seen any issues with the shutter speed. It is even slower when I do trichromatic capture because only one set of LED’s are on at a time. But the electronic shutter and the fuji remote app on my phone keeps vibrations at bay.
I am leaning toward the left setting but it is a close call and most likely it won’t make too much of a difference in the final scans. But then hey, why buy the calibration target in the first place? haha
@Harry Yes, this is the 35mm target shot at 1:1 and full resolution. I like to pin the lens focus ring at 1:1 and use the macro rail to focus. There is something satisfying about the film being reproduced at full size on the sensor. Also, I shoot a fair bit of 120 so the larger sensor helps with that.
I’d go for the right…but you’ll be looking at your images with a loupe?
Anyways, both seem wildly good enough for normal sized prints (whatever normal means)
Are you getting perfect flatness on cut strips with that Valoi holder, and with medium format as well? I have heard mixed reviews on that. I had to ditch my Negative Supply carrier due to flatness problems, and am currently using the Lobster. It’s super flat, but a little finnicky to use for high volume.
I have not had any film flatness issues with the Valoi kit. They are injection molded and hold the film nice and tight. Maybe a bit too tight for 120 but I would rather that then loose. I had some vignetting issues with the 35mm holder but after I trimmed off a little ridge it had on the inside the issue is gone. Stay away from their other non standard holders, they are poorly made 3D printed parts and I returned them.
Thanks, you’re results look very good, but without meaning to be (too) pedantic I’m wondering if you are just using the 36 x 24mm part of the sensor or the full width of the sensor 44mm x 29.5mm which is what I understand when you say 'full size". I’d say that whichever method you used you are getting the full information from the slide or negative. Lenses dedicated to a particular magnification will get slightly more from Vlad’s Test Chart. Magnum Photos also use a GFX100 but they include the mount as well, and a bit more, so end up with around 22MP for the image itself, and a much smaller magnification of course.
My lens focuses to 1:1 so that’s what I shoot at. Which means the neg will be 36x24 but my file is the full size of the sensor and I just crop it in post. I like a tiny bit of rebate on my final images so I don’t use the full frame 35mm mode on the GFX. Thanks for the link!
Thanks for clarifying that, I would think that your lens will indeed perform better at 1:1, so not using the full sensor at a greater magnification. I had actually thought that you might be using the “35mm format” option which as I understand it provides a smaller 61MP crop, directly equivalent to the high end Sonys. Surely you could still get some rebate just by backing of the focus a bit? I guess you get slightly more MP doing it the way you do.
I have a similar setup to you - same camera/lens combo - but I use a Viltrox tube and fill the 33x44 frame as much as possible. The Pentax 645 120mm is well-suited to magnification in excess of 1:1 using bellows or a tube, and having tested it pretty extensively would disagree that it performs better at 1:1 than c. 1.2x, so I’m wondering why you’re happy to dump the extra pixels? Perhaps just not printing large enough to worry about it?
That’s good to know. Im glad the lens still has some performance in the bank.
With my setup I have printed 35mm up to 16x24 and 120 up to 30x40 and felt like in both cases there was resolution to spare. At some point I feel like you are just enlarging the grain rather than increasing the image resolution. I get 1:1 for 35mm and 1:1.8 for 120 6x6 and these magnifications seem to work well for me.
I’m pretty happy with the results, but the quality was already pretty good with the Sony A7RIV with the 90mm Macro. If you have a 100MP camera, you have to see if it can do better.
I’ve printed big enough that I felt like I was benefiting from the extra pixels but I haven’t printed a direct comparison, so it’s possible that any benefit was negligible. I think it’s a case of knowing the lens is capable of resolving this detail I can’t bring myself to not to use as much of the sensor as possible, but I know what you mean about enlarging grain. This setup replaced a Flextight and I think it’s better for perhaps not being able to resolve the grain to the extent the Flextight was. I mainly scan 645 (I interchange GFX and Pentax 645N cameras for actual photography), and it’s ideal for that at 1:1 without the tube. Other issues with the tube is additional weight/length and sensitivity to vibration due to higher magnification. I never got on with the tripod mount on that adapter you have, too loose, so I’m talking to someone about having a collar machined for my Kipon adapter as it’s not ideal having the camera as the mounting point.
Nice. I love the perfectionism! My adapter is nice and tight but I have it secured with a threaded insert directly attached to the macro rail. I don’t use the quick release arca plate.
For me it probably comes down to not caring as much about ultimate sharpness. I mean it took me a few years to even think about calibrating the rig haha. The only reason I have the GFX is because I use it for work. If it was solely for scanning use I would have gone for a full frame camera or a de-bayered mirrorless for some full on trichromatic inversions.
…ideally with a second collar that fits the front of the lens, but wait, I have an idea…
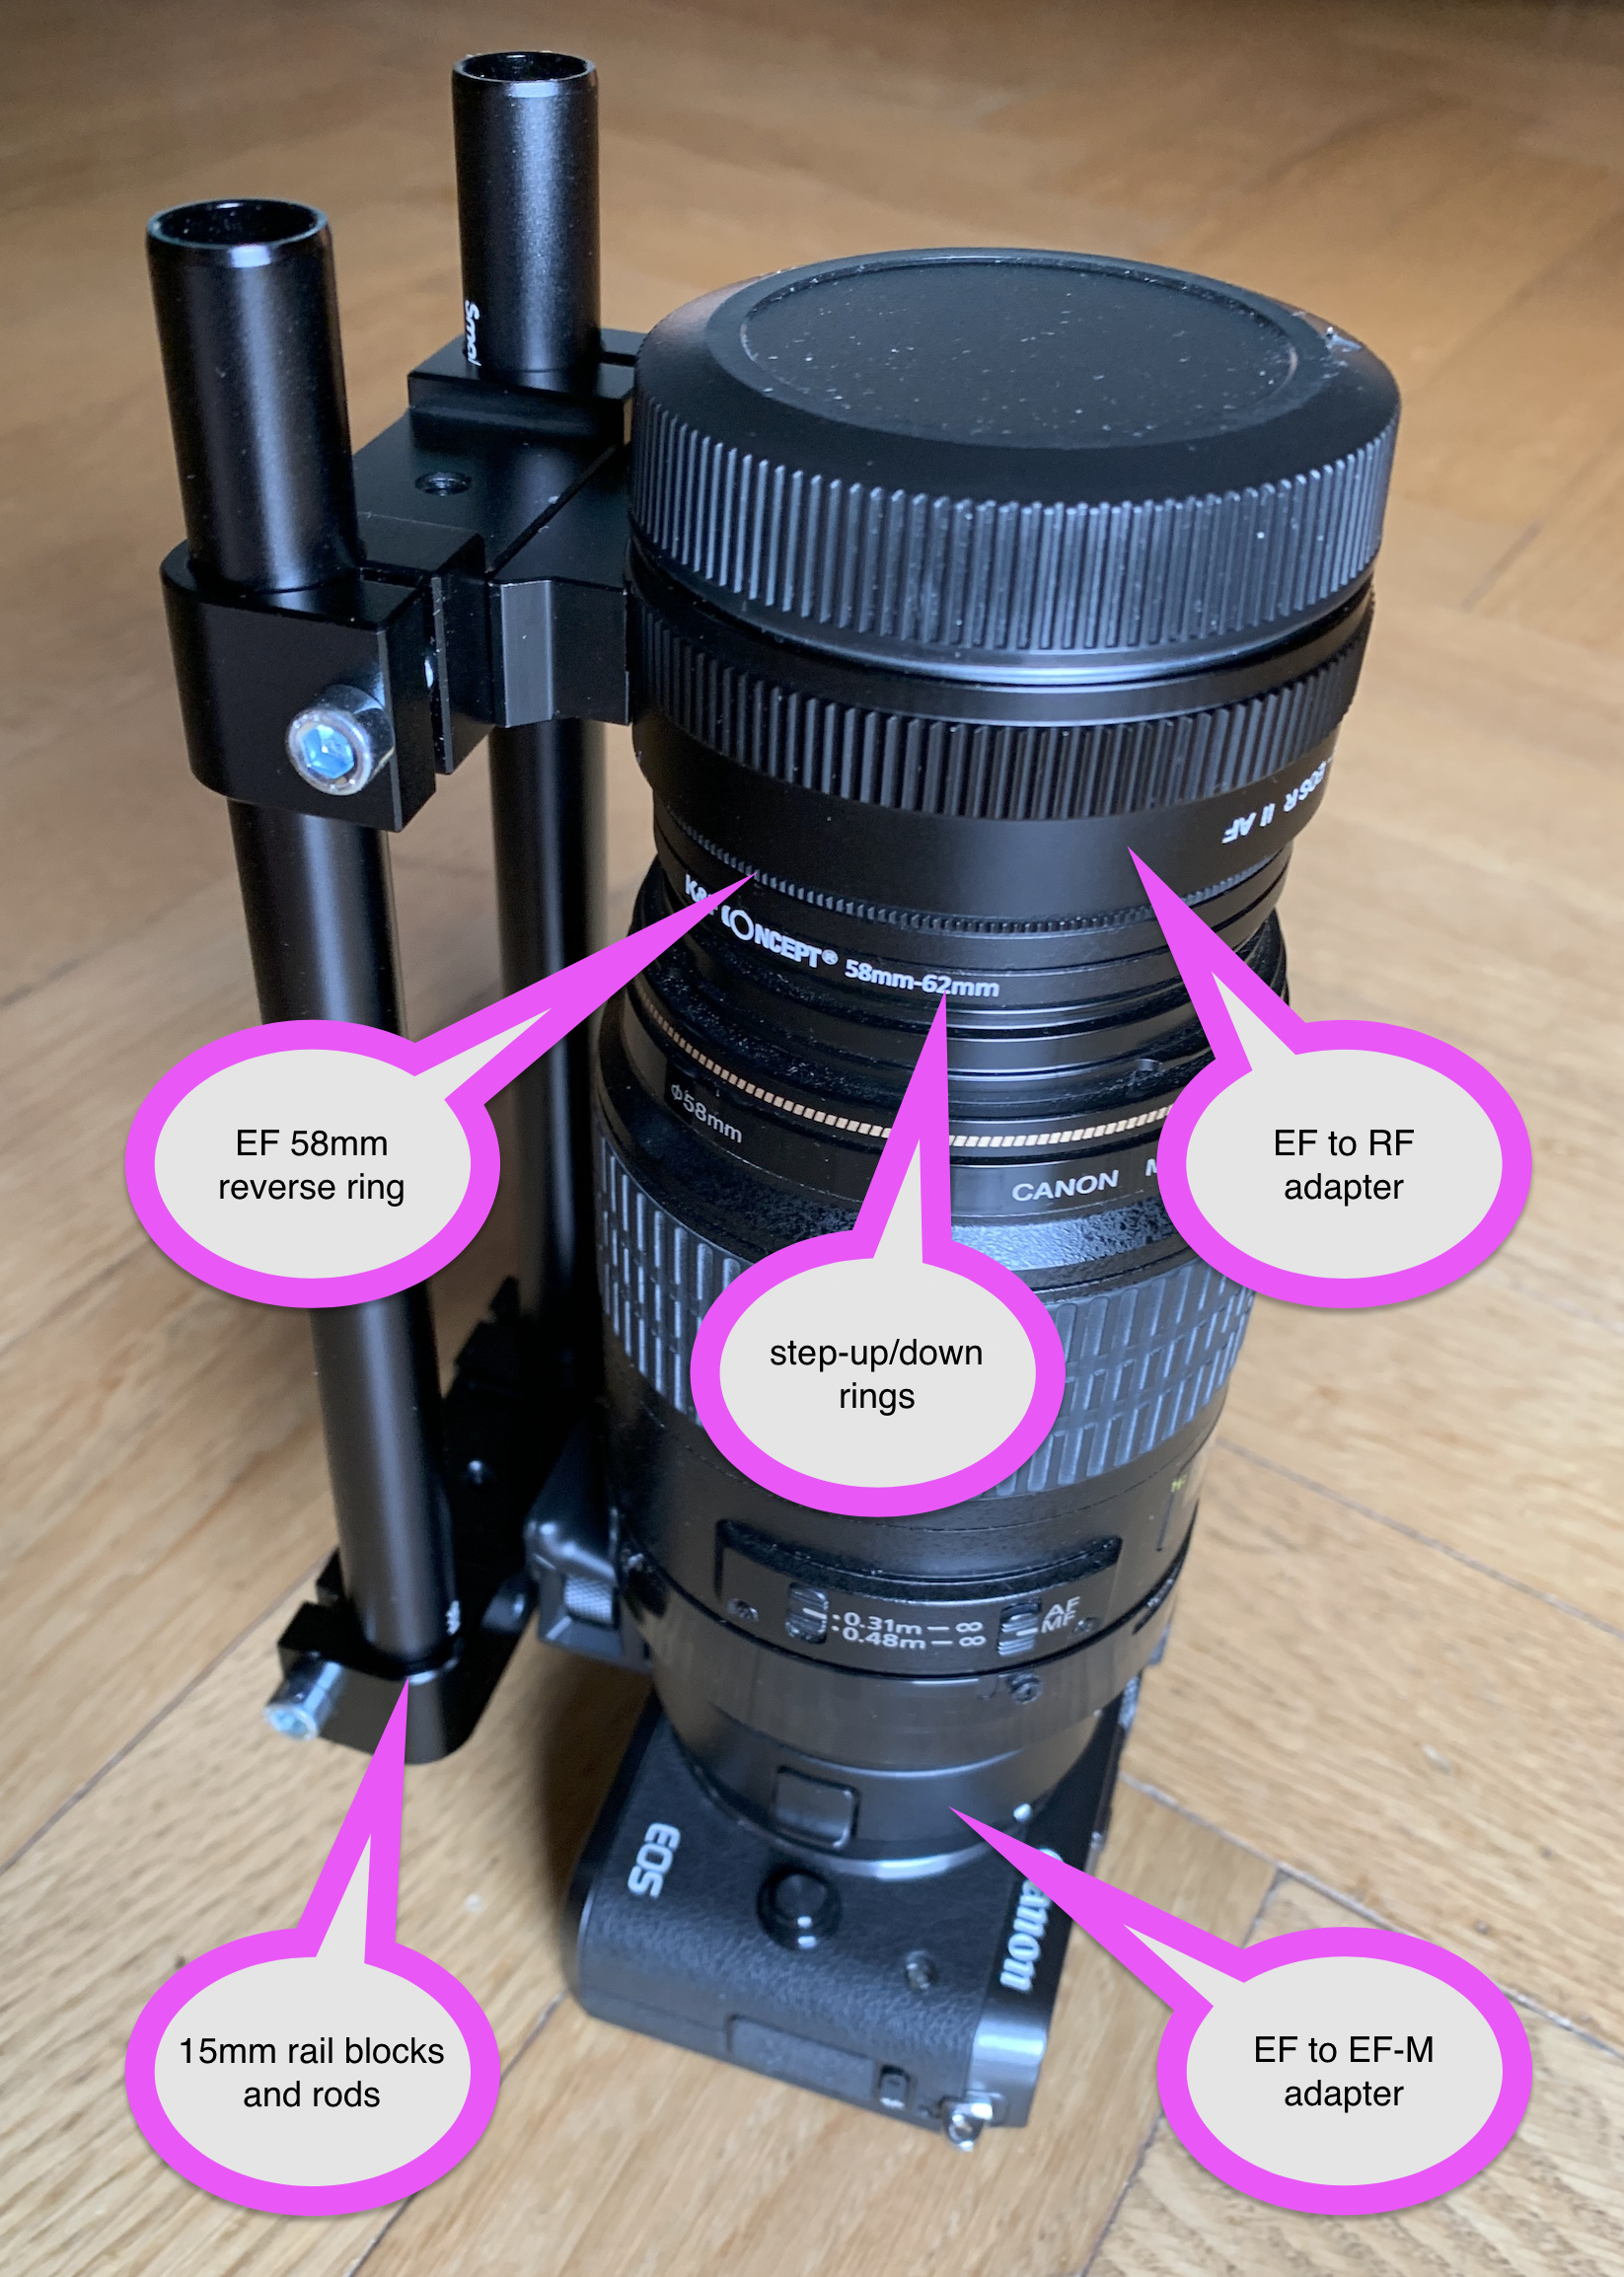
Imagine two identical adapters with feet and a reverse ring…and there is no need for having things machined. Check out the picture of an impromptu proof of concept.
This “rail” consist of the lens sandwiched between to (different) adapters. By flipping the rail blocks, I got fairly good positioning that only needed one washer. There are also two filter adapters, they serve to align the soles of the two feet.
Instead of the video rail, a longish camera plate should work too
Blimey, this looks very sturdy - but doesn’t this pretty much take the lens out of action for actual photography as it would be a slog connecting everything back up again? I do have two identical copies of the 645 120mm f4 but was planning to move one along.
Yeah I think we’re in the same boat here - I have the GFX and 645N for other use, so adapting the Pentax-A 120mm was a no-brainer, especially since my GF120 is absolutely useless for flat field work with a tube attached. Really happy with the results and the only issues are vibration and how the GFX cameras can be a bit clunky tethered.
If you switch from and to action every five minutes, yes, but it takes loosening two screws and the twist of two adapters to free the lens.
I recommend to keep the scanning rig intact most of the time. Assembly and disassembly are not hard, but adjusting takes some time and effort.
Gear other than APS-C is too heavy to hang from a camera plate without lens support. With two adapters, the front adapter mustn’t necessarily be bolted on, but can rest on the railblock
Two boards of black 19 mm MDF are held together by two heavy duty brackets. These are built for load (150 pounds each) rather than for precision, therefore some shims had to be added.
The Novoflex rail holds the caged Canon R7 and the Laowa 65mm APO Macro in a vertical setup. If I wanted, I could convert it to a horizontal setup with not much effort.
A Kaiser Plano shines its light through a CNC’d opening above which the negative holder will do its job. I can also replace the Kaiser by an iPad that I set with some kind of lavender background that compensates the orange mask to a certain degree.
As always, there is a backside. You can see that I taped the edge of the Kaiser to reduce stray light. Two screws hold the rail…and you might see more holes that allow the rail to be set higher or lower depending on film size, lens and camera used.
And that’s the "heavy gear "configuration. The lens is held in place by two EF to RF adapters, one of which is attached to the front of the lens by a reversing adapter. This time, the Kaiser sits on the baseboard in order to show the space between the base and rail-holder boards. The heavier the gear, the closer you want it to a firm structure.
I might write up a paper with plans and more hints…but not today … and should you have any questions that aren’t answered in previous posts, please get in touch with PM.
Great that you’ve kept with the elegant simplicity of your prototype from 2024. This looks really solid and I love how compact it is. Relatively inexpensive as well, particularly if you compare it with the cost of the generally flimsy options from the major film copying brands. Presumably you do the shimming with the aid of your preferred alignment method and then it is so solid that it just stays that way. Can you easily get material like MDF cut using CNC where you are?
To align the vertical board to exactly 90 degrees relative to the baseboard, I put a mirror below the vertical board, just in contact with the bracket. Looking along the edge of the vertical board, the mirror image has to continue without any kink, it should look like a straight line from beginning to the end. While the screws weren’t fully tightened, I pushe wedges between the board and the brackets until the edges and mirror images were in a straight line. Washers hold the parts now.
I got the black MDF cut by a local store and the cutout and the holes were then CNC’d by someone with the respective (pro) machinery. Amazing device, held the boards by vacuum. Programming and execution in less than 30 minutes.