I’m using using Negative Lab Pro 3.1.1 and I’m scanning with a Valoi easy35 attached to a Nikkor 60mm f/2.8 AF on a Sony A1 II. Overall, I’m getting very good results but in some images, I’m often seeing discontinuities in gradients. Here is an example below:
As you can see, there’s this hard edge in the color of the out of focus areas. No settings that I change in NLP makes any difference here - it stays the same.
However, If I switch the profile from the Negative Lab v2.3 that NLP sets to a linear camera profile for my Sony A1 II, the issue goes away
I can also see the hard edge shifting around a bit if I adjust the white balance in LR but not if I adjust it in NLP.
What is causing these artifacts? It seems to me that there’s something wrong with a LUT or some curve in the profiles produced by NLP.
What do you get if you convert manually instead of using NLP? (flip the tone curve from / to \)
I have problems seeing what you mean. Please add something that points to the part of the image and/or make the screen capture include more area in order to provide some context.
Thanks, I can now see what you mean. Looks like it’s subtle and mostly visible when pixel-peeping.
Does it matter under normal viewing conditions? And does it also appear in exported files like TIFF and JPEG? So far, I’ve never seen what you get, but I haven’t been looking for it either…
Difficult to debug with the info we have. Better get in touch with @nate, he might be able to find the source of your troubles. He’ll also need more info and samples and will ask for what could possibly help for debugging.
As usual I’m a bit late to the party, and also rather stumped. You say this is happening on “some” photos. Can you describe what kind of photo shows up this problem - is it systematic to a particular image characteristic? Also, the illustration you show appears to be a very big magnification of the original. Could you post a much lower degree of magnification so we can see the context.
I doubt this is an NLP profile problem because I and many others are using NLP profiles with no such issues.
When were the photographs made, what conditions were the negatives stored in and do you know what were the film processing conditions (quality, reliability of the processing company)? I’m tending to think the problem you see is actually embedded in the film and not anything done since, but we need more evidence before concluding on anything.
As you can see, the problem is visible even when viewed in context. Also, I can assure you that this is not present on the negative itself. The biggest evidence for this is that if I switch to a generic linear profile, the problem disappears. Otherwise, the negative hasn’t been stored really, I scanned it the same day as I picked it up from the lab.
I can’t see a clear pattern for when this shows up, but is of course highlighted when it appears in a gradient.
A manual conversion with exaggerated contrast settings and a NLP profile of a Canon EOS 5D shows nothing like the patches you get in the places I marked with the circles:
Looking for the profile…I found that NLP does not seem to have a profile for the A1 ii yet,
at least not on my Mac. What does your Lightroom show when NLP is on this image?
If it’s a dedicated profile for the A1ii, where do you have it from? Has @Nate posted a link to this profile?
I’m not sure I understand. I’m seeing a screenshot of DxO PhotoLab but NLP is a Lightroom Classic plugin and the profiles are built for Lightroom.
I have not installed anything custom related to NLP, I have simply installed NLP and use the camera profile that NLP automatically applies to the image when performing the conversion. That profile yields the artifacts described above. If I instead manually change the camera profile to a linear profile built for the A1 II that I installed for completely different reasons, the artifacts disappear.
Yes, and I wanted to see what’s in the image without all things Lightroom and NLP.
That’s normal, and NLP having no profile for the A1ii attracts whatever profile, fitting or not.
Testing NLP with Color Model set to “None” and the manually selected profile “Adobe Landscape”, NLP produced smoother transitions in the critical areas. Therefore, and until a profile for the Sony A1ii is available in NLP, I recommend to set NLP to Color Model “none” and manually select a profile in Lightroom.
Upper row: Conversion with “Basic” and pre-saturation set to 1…5 (stars indicate setting)
Lower row: Conversion with “None” and pre-saturation set to 1…5 (stars indicate setting)
@nate Is there a way to see which profile NLP selected?
I also propose that NLP should be updated to e.g. NOT attract a profile when the camera specific profile is missing. Maybe we could manually select a profile in NLP out of those delivered by Adobe. As of now, we get the impression that the correct profile is used, which is not the case here. Some kind of indication and/or tooltip would highly be welcome. TIA.
Tested with NLP 3.1.1 and LrC 15.1 on macOS 26.2 on 2020 M1 MacBook Air.
There is a NLP profile for Sony A1ii as of NLP v3.1, so that isn’t the issue…
There are a couple of potential issues here with the scan.
First, it’s possible some data is being clipped in the red channel… while it is generally good to “expose to the right,” you risk creating some issues when you are basically right up against clipping and there may be some grain that actually is clipping. The NLP camera profile does not soften the highlights in the pre-processing (which results in more accurate conversions, but can cause posterization like this if the original has clipping in it).
Second, it looks like this was shot through some kind of filter or through plastic… you can see that even when it is in the negative form. It’s like a weird mosaic over the whole image.
All that said, when I set NLP to “NLP - Neutral” I don’t see any discontinuities on my screen in the way that they show up in the image you shared. Although I do see the weird mosaic overlay that is visible on the negative itself…
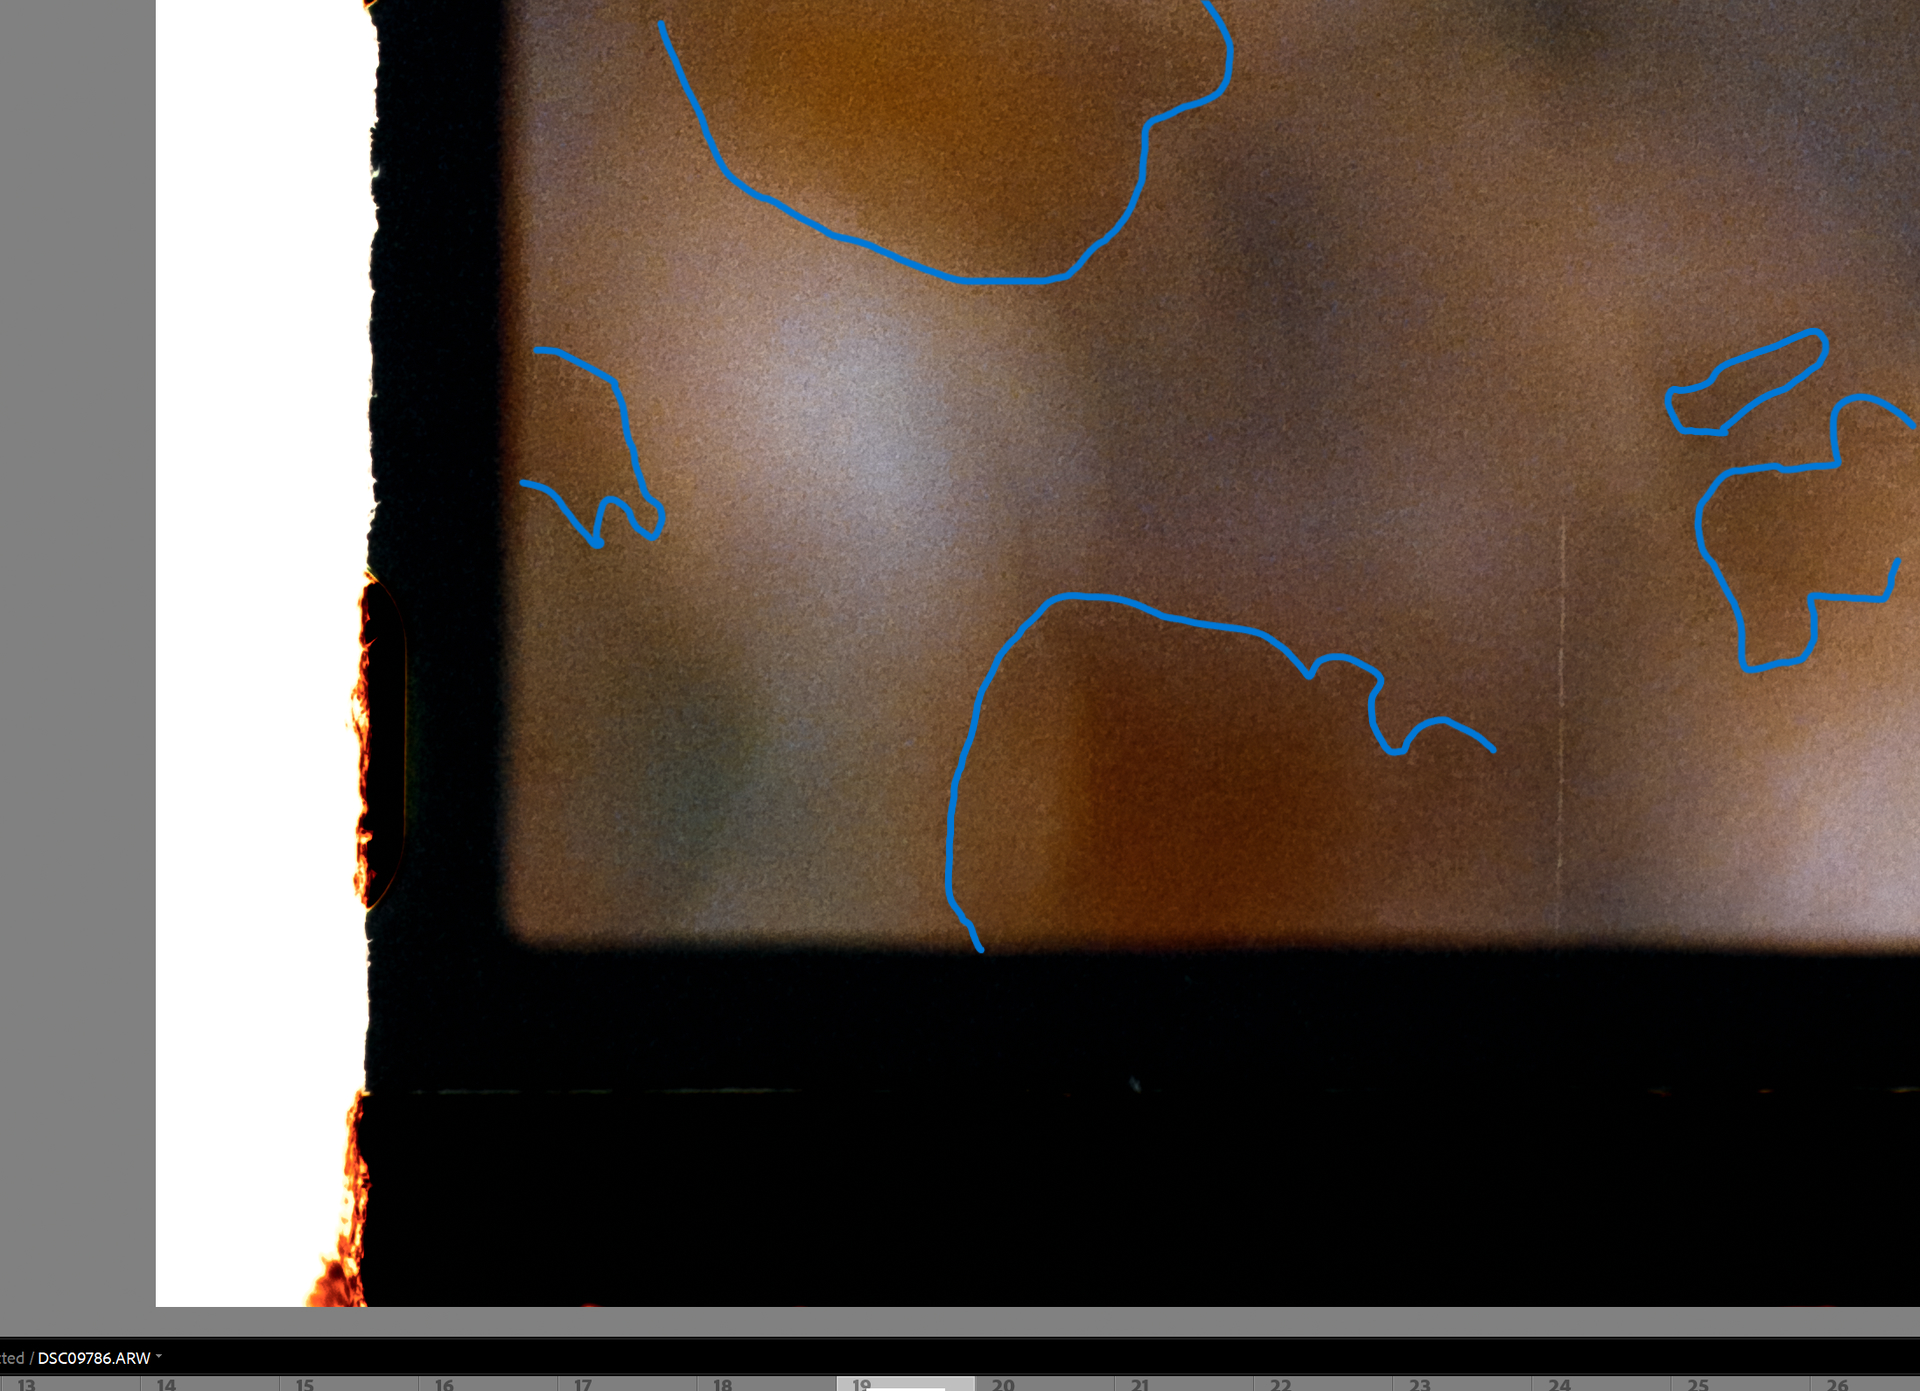
I have found that the discontinuities change based on the white balance set in Lightroom itself, there’s some sort of threshold effect. I think that you will find that if you adjust the white balance slider in Lightroom, the discontinuities appear and also shift around. In fact, I believe you have discontinuities in the screenshot you posted, just more subtle. I highlighted them in a screenshot to illustrate:
I am able to reproduce this without even involving NLP itself at all. If I select the Negative Lab Pro v2.3 profile, manually invert the image using the tone curve and then manipulate the WB slider, I can see the “threshold” shifting around. If I switch to a linear profile that I got from Tony Kuyper, the artifacts disappear. It is very hard for me to believe that the issue is in the image itself when it’s so clearly tied to the profile and in an area which is far from being clipped.
I experimented a bit. I used DCPtool to replace the LookTable of the NLP profile with the LookTable from the Linear profile from Tony Kuyper (which I believe is the original LR profile, just with the ToneCurve replaced with a linear one). This completely removed discontinuity. This leads me to believe that there is some non-smoothness in the LookTable. The LookTable from the NLP profile also has a much higher resolution than the other one, which would increase the risk of that.
Yes, this is expected if you have clipping in the original digital capture.
If you have still have access to the negative, trying capturing it with the exposure a bit less so that you are well within the histogram.
Did you replace the LookTable, the ToneCurve or both?
The “Linear” tone curve from Kuyper (and others) does not actually produce truly linear results because it does not account for highlight smoothing happening in Lightroom behind the scenes (which Lightroom added in Process Version 3 - prior to that, a linear profile would actually behave linearly through the entire tonal range). In a situation where the digital capture is overexposed, the behind the scenes highlight smoothing may mask the fact that some of the original data is clipping (producing smoother tones in this instance), but at the cost of color and tonal accuracy through the full tonal range.
So the best fix would be to simply be a bit less aggressive in trying to expose to the right.
But of course, you can use other profiles and just set the color model to “none” as you have here.